The tutorial:
******
01
Open a new Transparent image 900
X 550px
Selections - Select All
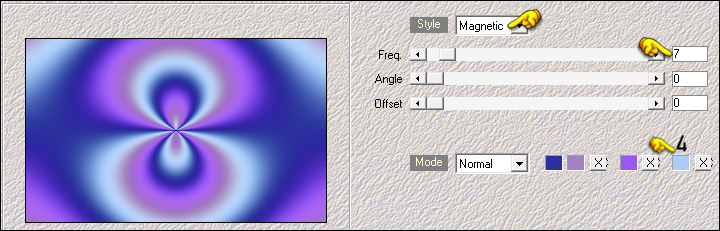
02
Open "Fractal_Image from tray
Edit - Copy
On your main work image: Edit -
Paste - Paste Into Selection
Selections - Select None
***Note: If you are
using different colors, colorizing won't give the same
result.
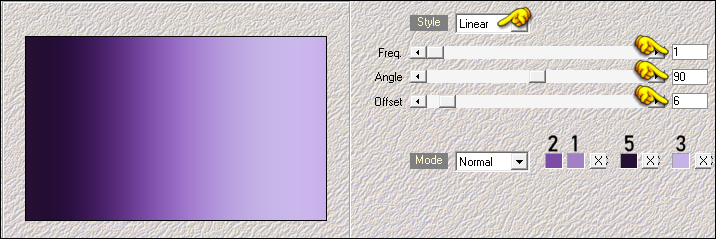
The best method is to use Mehdi - Wavy
Lab 1.1
Ignore Step#2
Using your own colors and using
a bright shade for Color 3
Example:
 ***
***
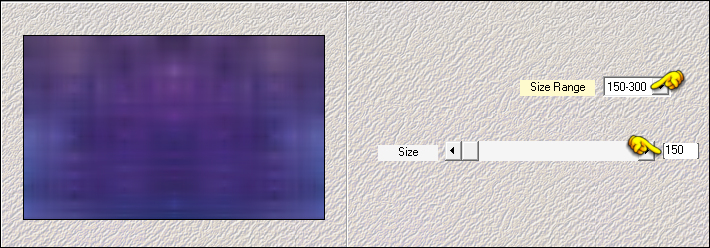
03
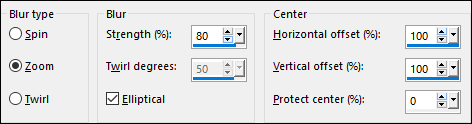
Adjust - Blur - Radial Blur
04
Layers - Duplicate
Image - Mirror - Mirror Horizontal
Lower the Opacity to 50
Layers - Merge - Merge Down
05
Layers - New Raster Layer
Effects - Plugins - Mehdi - Wavy Lab
1.1
06
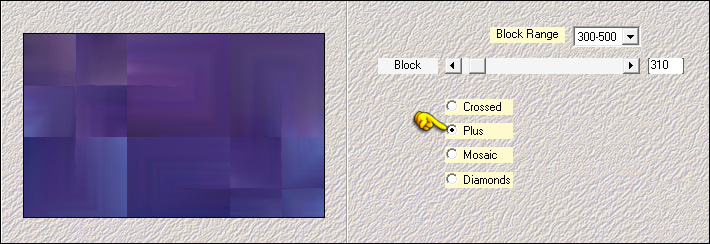
Effects - Plugins - Simple - Diamonds
Effects - Plugins - Simple Pizza Slice
Mirror
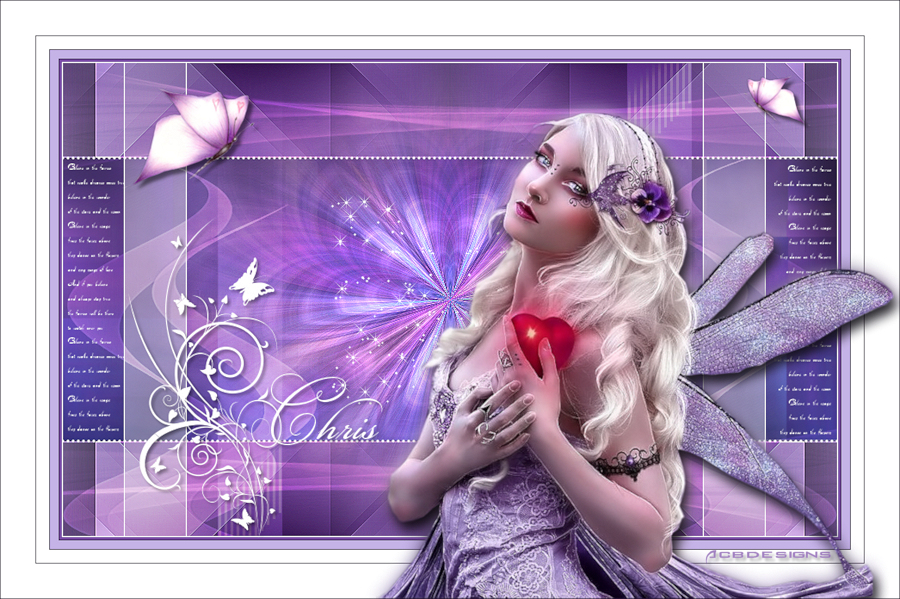
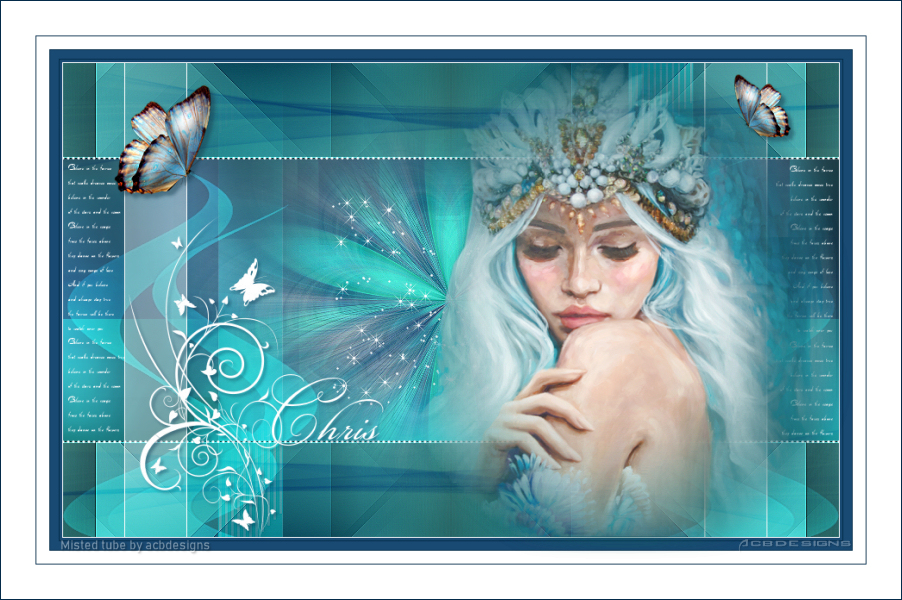
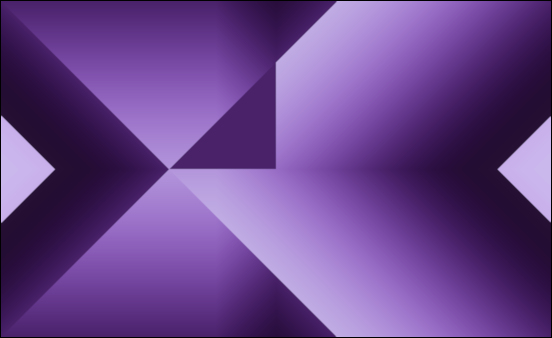
Result:
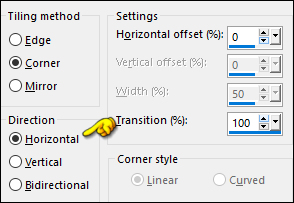
07
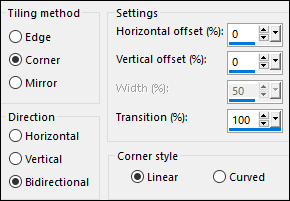
Effects - Image Effects - Seamless
Tiling
08
Effects - Image Effects - Seamless Tiling - Preset -
Side by Side

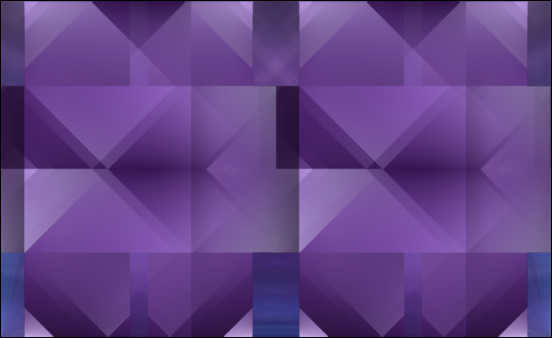
09
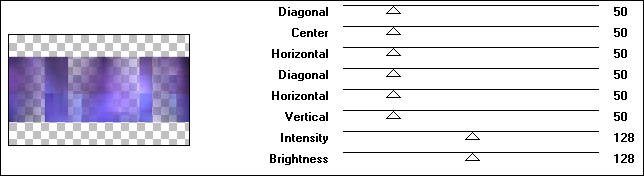
Effects - Plugins - Filter Factory -
Gallery A - Weave
10
Effects - Image Effects - Seamless
Tiling
Layers - Duplicate
Image - Mirror - Mirror Horizontal
Layers - Merge - Merge Down
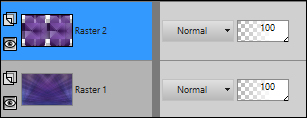
Your work and Layer Palette should
look like this now:
11
Effects - Plugins - Simple - Half Wrap
12
Effects - Plugins - Simple - Top Left Mirror
13
Selection Tool (S) - Custom Selection

Press the Delete key on your keyboard
Selections - Select None
Effects - Edge Effects - Enhance
14
Activate the Bottom Layer (Raster1)
Layers - Duplicate
Layers - Arrange - Bring to Top
15
Effects - Plugins - Mehdi - Weaver
16
Effects - Plugins - Mehdi - Sorting
Tiles
17
Image - Resize - 60% - Resize All
Layers - Not checked
Effects - Image Effects - Seamless
Tiling - Preset - Side by Side
Effects - Edge Effects - Erode
18
Effects - Plugins - Graphics Plus -
Cross Shadow - Default settings
19
Activate the Bottom Layer (Raster1)
Layers - Duplicate
Layers - Arrange - Bring to Top
20
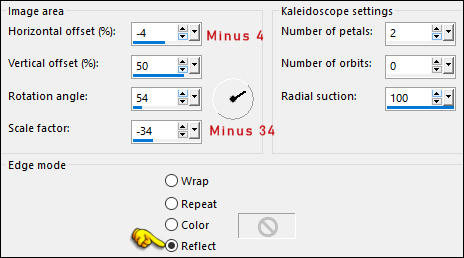
Effects - Reflection Effects -
Kaleidoscope
21
Effects - Plugins - Filters Unlimited
- Image Enhancement - Sunshine
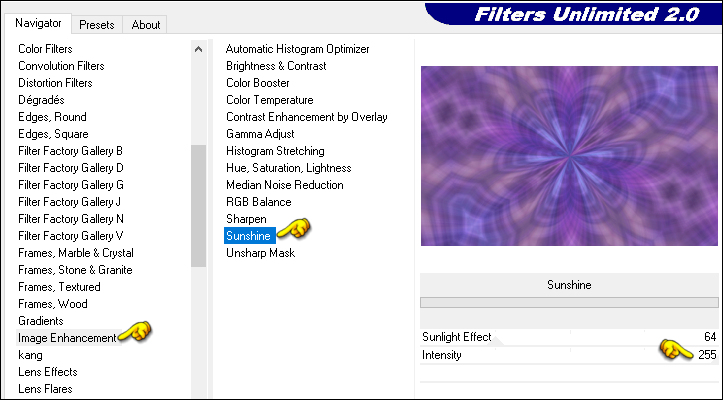
22
Layers - Load/Save - Load Mask From
Disk - "2020"
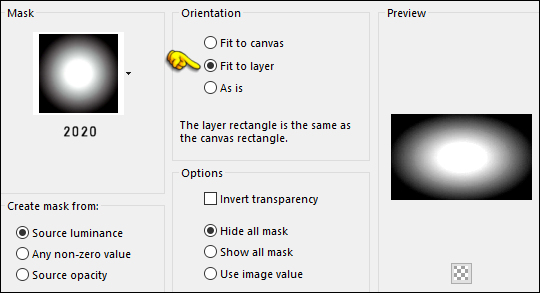
Layers - Duplicate
Layers - Merge - Merge Group
23
Effects - Plugins - Filters Unlimited
- Image Enhancement - Sunshine - Same settings
Note: This Step is
optional, the result will depend on the colors you are
using
Effects - Edge Effects - Enhance
Result:

24
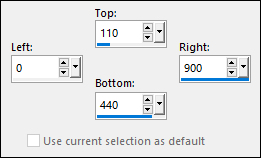
Layers - New Raster Layer
Selection Tool (S) - Custom Selection
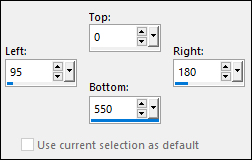
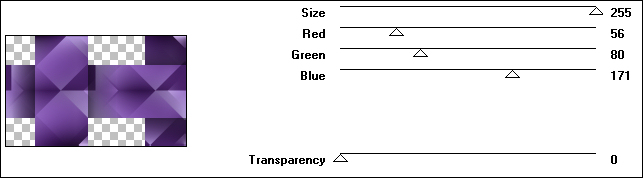
Effects - 3D Effects - Drop Shadow:
0/75/100/0 Color: 3 #c5b3e7

Selections - Select None
25
Effects - Image Effects - Seamless
Tiling - Preset - Side by Side
26
Effects - Plugins - Filters Unlimited
- Tramages - Tow The Line - Default settings
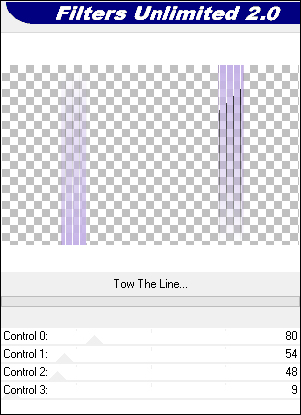
Change the Blend Mode to Soft
Light
Effects - Edge Effects - Dilate
27
Open "TD_Deco1_Chris"
from tray
Edit - Copy the Middle Layer
On your work image: Edit - Paste -
Paste As New Layer
No need to move
28
Change the Foreground to color 4
#eec6dc 
Layers - New Raster Layer
Fill the Layer with the Foreground
Color
Layers - New Mask Layer - From Image -
"Narah_Mask_1462"
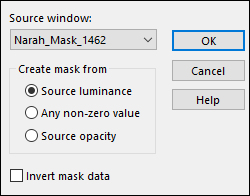
Layers - Merge - Merge Group
Change the Blend Mode to
Overlay and lower the Opacity to 70
Adjust - Sharpness - Sharpen More
29
Open "TD_Deco2_Chris"
from tray
Edit - Copy the Middle Layer
On your work image: Edit - Paste -
Paste As New Layer
No need to move
Note: This image is Preset to
Screen
30
Open "TD_Texto_Chris" from tray
Edit - Copy the Middle Layer
On your work image: Edit - Paste -
Paste As New Layer
No need to move
31
Layers - New Raster Layer
Fill the Layer with the Foreground
Color
Layers - New Mask Layer - From Image -
"TD_Mask_Chris"
Layers - Merge - Merge Group
Change the Blend Mode to
Overlay
33
Image - Add Borders - Symmetric
checked - 1px - fffffff

Image - Add Borders - Symmetric checked - 3px - #7b4da7

Image - Add Borders - Symmetric checked - 1px - #251033

Image - Add Borders - Symmetric checked - 10px -
#c5b3e7
Image - Add Borders -
Symmetric checked - 1px - #251033
Image - Add Borders - Symmetric checked - 15px -
#ffffff
Image - Add Borders - Symmetric checked - 1px - #251033
Image - Add Borders - Symmetric checked - 40px - #ffffff
34
Open "Kahlan_Butterfly" from
tray
Edit - Copy the Bottom Layer
On your work image: Edit - Paste -
Paste As New Layer
Image - Mirror - Mirror Horizontal
Image - Resize - 50% - Resize All
Layers - Not checked
Image - Resize - 75% - Resize All
Layers - Not checked
35
Pick Tool (K)

Enter these parameters for the X: and
Y: positions on the Toolbar
X: 141.00 Y:
100.00
Press M to Close the
Pick Tool
36
Layers - Duplicate
Image - Mirror - Mirror Horizontal
Image - Resize - 50% - Resize All Layers - Not checked
Pick Tool (K)
Enter these parameters for the X: and
Y: positions on the Toolbar
X: 864.00 Y: 86.00
Press M to Close the
Pick Tool
Layers - Merge - Merge Down
Effects 3D Effects - Drop Shadow:
5/5/50/5 Color: #251033
Adjust - Sharpness - Sharpen
37
Open TD_WordArt_Chris" from tray
Edit - Copy the Middle Layer
On your work image: Edit - Paste -
Paste As New Layer
Pick Tool (K)
Enter these parameters for the X: and
Y: positions on the Toolbar
X: 145.00 Y:
248.00
Press M to Close the
Pick Tool
Effects 3D Effects - Drop Shadow: 3/3/40/5
Color: #251033
38
Open "Tube_Fairy_Violet_GB" from
tray
Edit - Copy the Middle Layer
On your work image: Edit - Paste
- Paste As New Layer
Image - Resize - 90% - Resize All
Layers - Not checked
Pick Tool (K)
Enter these parameters for the X: and
Y: positions on the Toolbar
X: 436.00 Y:
108.00
Press M to Close the
Pick Tool
39
Layers - Duplicate
Click on the Layer below (original
tube)
Adjust - Blur - Gaussian Blur -
Radius: 10
Click on the Top Layer
Effects 3D Effects - Drop Shadow: 10/5/80/20
Color: #251033
Image - Add Borders - Symmetric checked - 1px - #251033
40