Please read my Terms (TOU) before doing the tutorial.
Thank you for putting a link to this tutorial by showing your realization on a website, forum or in an email!
With your result, you can make signatures, websets, incredimail letters, etc.
Please, credit to Tati Designs, thank you.
Materials
PSPX9 (you can use any version).
Download the tutorial material here:
Filters:
Mehdi / Weaver (download here).
&<Bkg Designer sf10 I> / Cruncher (download here).**
VM1 / Web Weaver (download here).**
FM Tile Tools / Roll Image (download here).
AFS Import / Sqborder2 (download here).
Graphics Plus / Cross Shadow (download here).
AP [Lines] / Lines - Silverlining (download here).
** Import this filter with "Unlimited".

IMPORTANT
It is forbidden to modify or rename files or remove the watermark.
Please do not use the material provided outside this tutorial.
Main tube by Jeanne. Birds tube by PamelaD.
The rest of the material used in the tutorial is mine.

Preparation
Duplicate the tubes. Close the originals.
Install the Filters in the "Plugins" folder of your PSP.
Colors
Choose colors in harmony with your tube.
This is the tutorial palette:

If you use other colors, you must play with the Blend Mode and the Opacity of the layers.

≈ Step 1 ≈
In your Materials palette:
Set your Foregroundcolor to (4) #ac1c2a 
Set your Backgroundcolor to (5) #f7f2c3 
≈ Step 2 ≈
Open the file "TD_Canal_Alfa_Navidad.pspimage". Duplicate and close the original.
(This will be the base of our work, which contains selections on the alpha channel.)
Rename the layer "Canal Alfa" as "Raster 1", "Trama 1", etc, depending on the language of your PSP.
≈ Step 3 ≈
Selections / Select All.
≈ Step 4 ≈
Open the file "TD_Background_Navidad" and copy.
Go back to your work and paste into selection.
Note: To adapt it to your colors, I recommend that you open a layer under and fill with a color of your choice,
which is not too dark. Then change the original background layer mode to "Luminance (Legacy)".
≈ Step 5 ≈
Selections / Select None.
≈ Step 6 ≈
Effects / Plugins / Mehdi / Weaver:

≈ Step 7 ≈
Effects / Plugins / Unlimited / &<Bkg Designer sf10 I> / Cruncher (default):
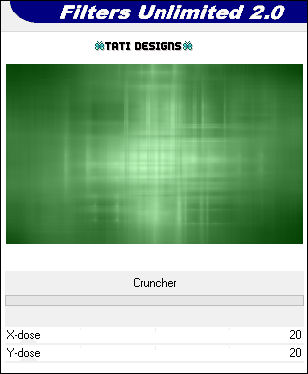
≈ Step 8 ≈
Effects / Edge Effects / Enhance.
≈ Step 9 ≈
Layers / Duplicate (2 times):
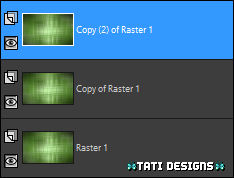
≈ Step 10 ≈
Effects / Plugins / Unlimited / VM1 / Web Weaver:
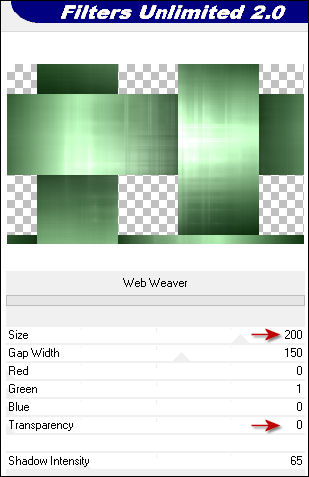
≈ Step 11 ≈
Effects / Image Effects / Seamless Tiling - "Stutter diagonal":
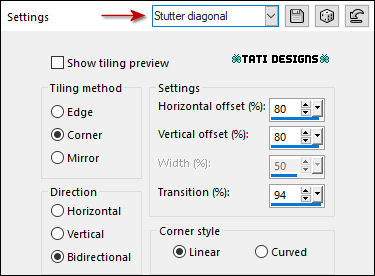
≈ Step 12 ≈
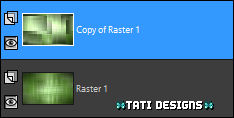
Layers / Merge / Merge Down.
≈ Step 13 ≈
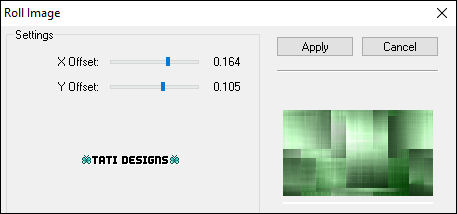
Effects / Plugins / FM Tile Tools / Roll Image:
≈ Step 14 ≈
Change the Blend Mode to "Multiply" and lower the Opacity to 70.
≈ Step 15 ≈
Activate the Bottom Layer ("Raster 1").
≈ Step 16 ≈
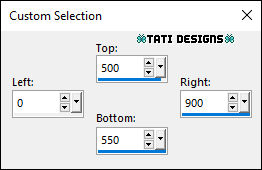
Activate "Selection" Tool (S) and click on "Custom Selection":

≈ Step 17 ≈
Selections / Promote Selection to Layer.
≈ Step 18 ≈
Layers / Arrange / Bring to Top.
≈ Step 19 ≈
Effects / Plugins / AFS Import / Sqborder2 (default):

≈ Step 20 ≈
Selections / Select None.
≈ Step 21 ≈
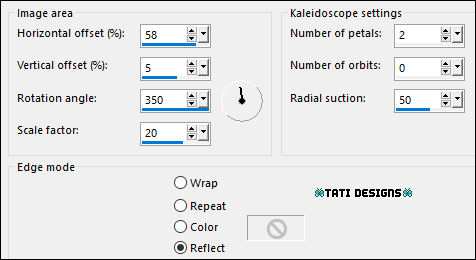
Effects / Reflection Effects / Kaleidoscope:
≈ Step 22 ≈
Effects / Image Effects / Seamless Tiling - "Side by side":
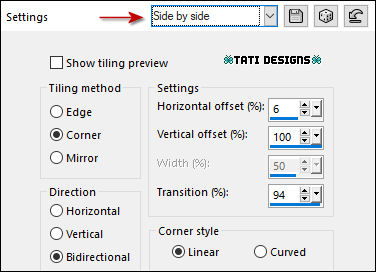
≈ Step 23 ≈
Image / Mirror.
≈ Step 24 ≈
Change the Blend Mode to "Soft Light".
≈ Step 25 ≈
Activate the Bottom Layer ("Raster 1").
≈ Step 26 ≈
Effects / Plugins / Graphics Plus / Cross Shadow:

≈ Step 27 ≈
Activate the Top Layer ("Promoted Selection"):
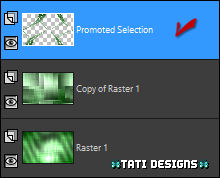
≈ Step 28 ≈
Layers / New Raster Layer and fill with the color (5) #f7f2c3 
≈ Step 29 ≈
Open the mask "TD_Mask_Navidad" and return to your work.
≈ Step 30 ≈
Layers / New Mask Layer / Fron Image:
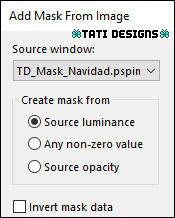
Layers / Merge / Merge Group.
≈ Step 31 ≈
Layers / New Raster Layer.
≈ Step 32 ≈
Selections / Load/Save selecction /Load Selection from Alpha Channel.
You will see that the selection is directly available "TD_Navidad_Sel1", click to "Load":
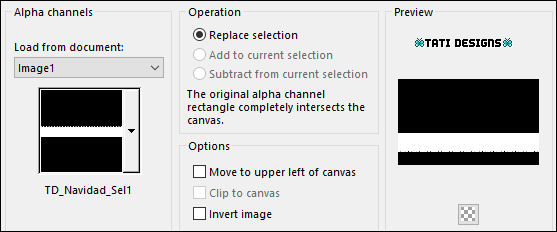
≈ Step 33 ≈
Activate "Flood Fill" (F) Tool and lower the Opacity to 50:

≈ Step 34 ≈
Fill the Selection with color #ffffff 
Reset the Opacity of the "Flood Fill" to 100.
≈ Step 35 ≈
Selections / Select None.
≈ Step 36 ≈
Layers / New Raster Layer.
≈ Step 37 ≈
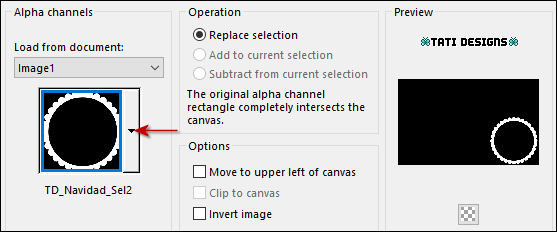
Selections / Load/Save selecction /Load Selection from Alpha Channel.
Show the menu and choose "TD_Navidad_Sel2", click to "Load":
≈ Step 38 ≈
Fill the Selection with color (4) #ac1c2a 
≈ Step 39 ≈
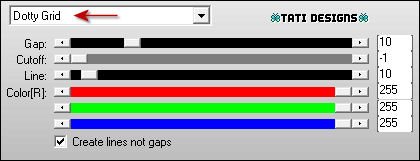
Effects / Plugins / AP [Lines] / Lines - Silverlining:
≈ Step 40 ≈
Selections / Select None.
≈ Step 41 ≈
Layers / New Raster Layer.
≈ Step 42 ≈
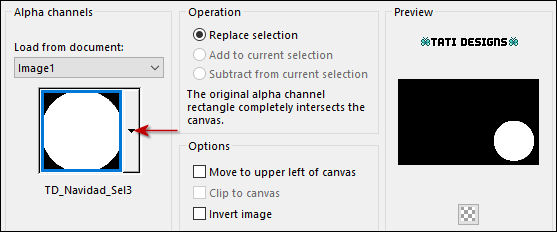
Selections / Load/Save selecction /Load Selection from Alpha Channel.
Show the menu and choose "TD_Navidad_Sel3", click to "Load":
≈ Step 43 ≈
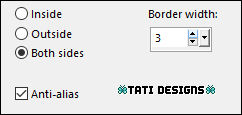
Selections / Modify / Select selection borders:
≈ Step 44 ≈
Fill the Selection with color (2) #327032 
≈ Step 45 ≈
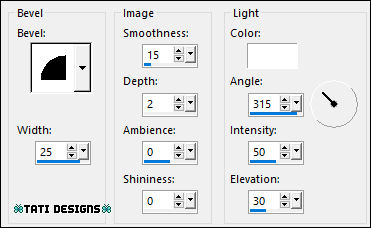
Effects / 3D Effects / Inner Bevel:
≈ Step 46 ≈
Selections / Select None.
≈ Step 47 ≈
Layers / Merge / Merge Down.
≈ Step 48 ≈
Activate "Magic Wand" Tool, Tolerance and Feather to 0.
Select the inside of the circle.
≈ Step 49 ≈
Selections / Invert.
≈ Step 50 ≈
Effects / 3D Effects / Drop Shadow: 0 / 0 / 80 / 20 / Black 
≈ Step 51 ≈
Selections / Select None.
≈ Step 52 ≈
Open the file "TD_Imagen_Navidad"and copy.
Return to your work and paste as new layer.
≈ Step 53 ≈
Activate Tool "Pick" (K) and modify the positions of X (591,00) and Y (255,00):

Press the "M" key to deactivate the "Pick" Tool.
≈ Step 54 ≈
Selections / Load/Save selecction /Load Selection from Alpha Channel.
Show the menu and choose again "TD_Navidad_Sel3", click to "Load":

≈ Step 55 ≈
Selections / Invert.
≈ Step 56 ≈
Press the "Delete" key on your keyboard.
≈ Step 57 ≈
Selections / Select None.
≈ Step 58 ≈
Layers / Arrange / Move Down.
≈ Step 59 ≈
Go back to the layer above ("Raster 3").
≈ Step 60 ≈
Layers / Merge / Merge Down.
≈ Step 61 ≈
Effects / 3D Effects / Drop Shadow: 0 / 0 / 50 / 30 / Black 
≈ Step 62 ≈
Adjust / Sharpness / Sharpen.
≈ Step 63 ≈
Open the tube "Tube_349" and copy.
Return to your work and paste as new layer.
≈ Step 64 ≈
Image / Resize: 2 times to 50% ("Resize All Layers" - Not checked).
≈ Step 65 ≈
Activate Tool "Pick" (K) and modify the positions of X (4,00) and Y (248,00):

Press the "M" key to deactivate the "Pick" Tool.
≈ Step 66 ≈
Adjust / Sharpness / Sharpen.
≈ Step 67 ≈
Effects / 3D Effects / Drop Shadow: 3 / 3 / 50 / 5 / Black 
≈ Step 68 ≈
Layers / New Raster Layer.
≈ Step 69 ≈
Selections / Load/Save selecction /Load Selection from Alpha Channel.
Show the menu and choose "TD_Navidad_Sel4", click to "Load":

≈ Step 70 ≈
Activate "Flood Fill" (F) Tool and change the Match Mode setting to "None":

This will fill in all the selections with a single click.
≈ Step 71 ≈
Fill the Selection with color (3) #6c0508 
≈ Step 72 ≈
Effects / Plugins / AP [Lines] / Lines - Silverlining (like before):

≈ Step 73 ≈
Selections / Select None.
≈ Step 74 ≈
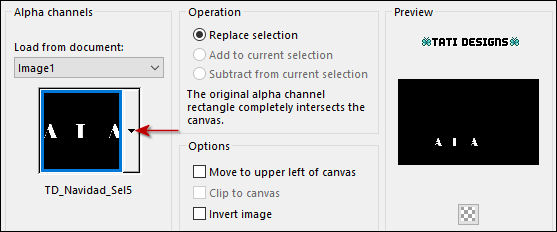
Selections / Load/Save selecction /Load Selection from Alpha Channel.
Show the menu and choose "TD_Navidad_Sel5", click to "Load":
≈ Step 75 ≈
Fill the Selection with color (1) #003d0b 
≈ Step 76 ≈
Effects / Plugins / AP [Lines] / Lines - Silverlining (like before):

≈ Step 77 ≈
Selections / Select None.
≈ Step 78 ≈
Effects / 3D Effects / Drop Shadow: 3 / 3 / 50 / 5 / Black 
≈ Step 79 ≈
Open the tube "TD_Bolas_Navidad" and copy.
Return to your work and paste as new layer.
≈ Step 80 ≈
Activate Tool "Pick" (K) and modify the positions of X (766,00) and Y (-1,00):

Press the "M" key to deactivate the "Pick" Tool.
≈ Step 81 ≈
Effects / 3D Effects / Drop Shadow: 0 / 0 / 40 / 20 / Black 
≈ Step 82 ≈
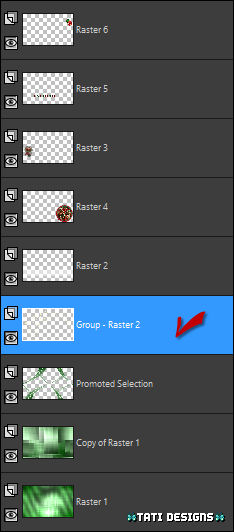
Activate the mask layer ("Group - Raster 2"):
≈ Step 83 ≈
Open the tube "JVDE_Lien" and copy.
Return to your work and paste as new layer.
≈ Step 84 ≈
Image / Resize: 70% ("Resize All Layers" - Not checked).
≈ Step 85 ≈
Activate Tool "Pick" (K) and modify the positions of X (286,00) and Y (24,00):

Press the "M" key to deactivate the "Pick" Tool.
≈ Step 86 ≈
Adjust / Sharpness / Sharpen.
≈ Step 87 ≈
Layers / Duplicate.
≈ Step 88 ≈
Adjust / Blur / Gaussian Blur to 20.
≈ Step 89 ≈
Layers / Arrange / Move Down.
≈ Step 90 ≈
Change the Blend Mode to "Multiply".
≈ Step 91 ≈
Image / Add Borders / Symmetric - 1 pixel / Color: (1) #003d0b  or Black
Image / Add Borders / Symmetric - 3 pixels / White color: #ffffff 
Image / Add Borders / Symmetric - 1 pixel / Color: (1) #003d0b 
Image / Add Borders / Symmetric - 20 pixels / White color: #ffffff 
Image / Add Borders / Symmetric - 1 pixel / Color: (3) #6c0508 
Image / Add Borders / Symmetric - 50 pixels / White color: #ffffff 
≈ Step 92 ≈
Open the tube "TD_Deco_Navidad" and copy.
Return to your work and paste as new layer.
≈ Step 93 ≈
Activate Tool "Pick" (K) and modify the positions of X (6,00) and Y (7,00):

Press the "M" key to deactivate the "Pick" Tool.
≈ Step 94 ≈
Layers / New Raster Layer and add your name or watermark.
≈ Step 95 ≈
Image / Add Borders / Symmetric - 1 pixel / Color: (1) #003d0b 
≈ Step 96 ≈
Image / Resize: Width 950 pixels (Resize All Layers" - Checked).
≈ Step 97 ≈
Adjust / Sharpness / Sharpen.
≈ Step 98 ≈
Export your work as an optimized .jpg file.
It's over!
I hope you liked it and enjoyed it.

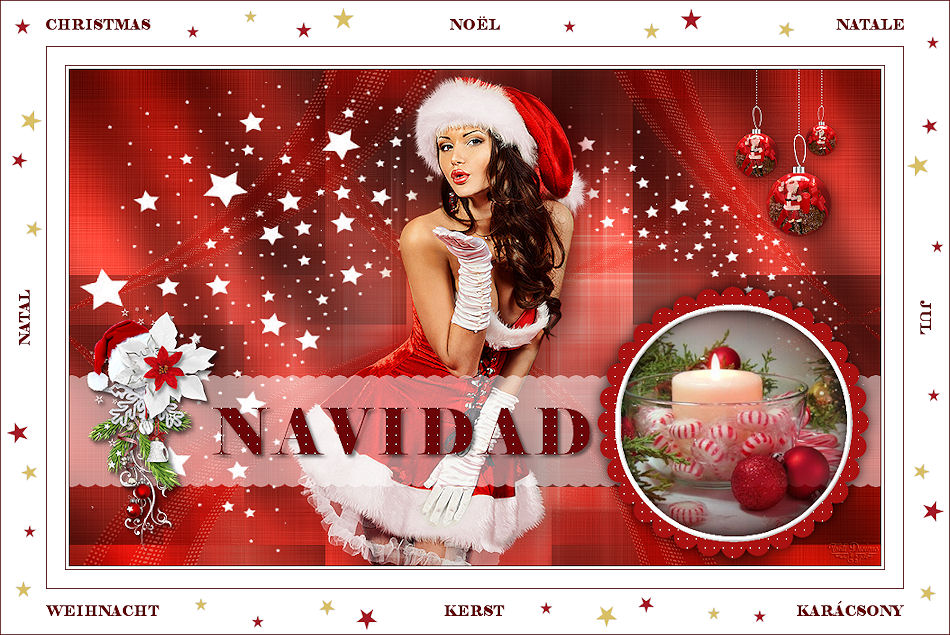
.:. Another version of the tutorial with tubes by Nadège (woman) and VaZsu (decos) .:.

.:. If you want to send me your work with the result of this tutorial, contact me .:.

 .:. Here you can see other versions of the tutorial .:.
