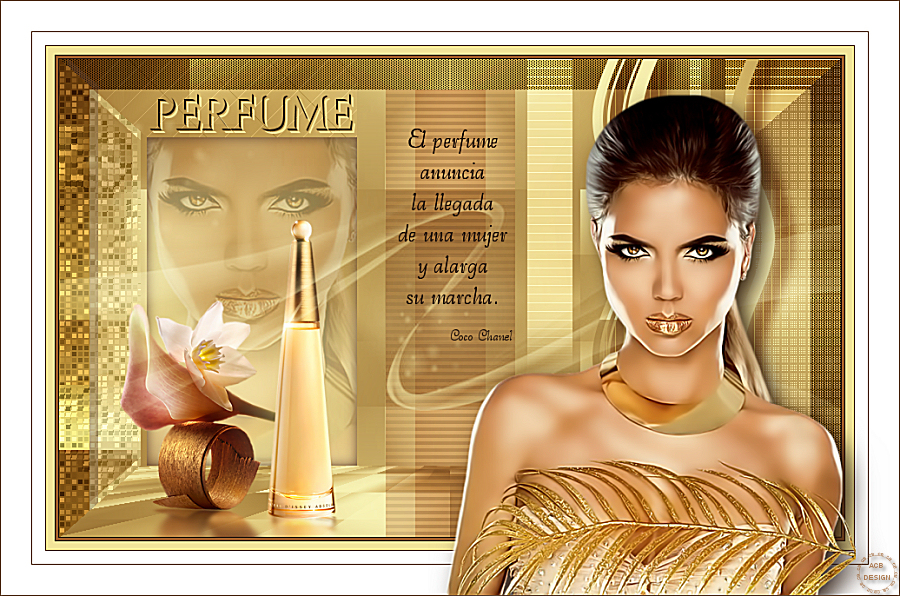
The tutorial:
01
Open a
new transparent image of 900 x 550
Fill the Layer
with the
Foreground
Gradient

02
Effects - Image
Effects - Seamless
Tiling
Adjust - Blur -
Gaussian Blur -
Radius: 30
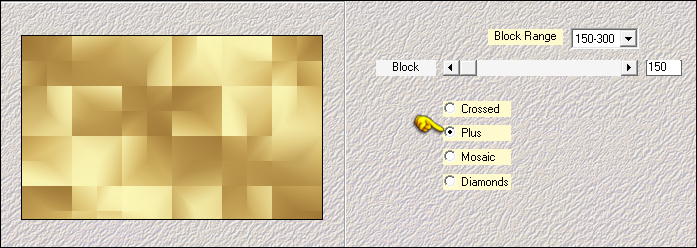
Effects - Plugins
- Mehdi - Sorting
Tiles
03
Layers -
Duplicate
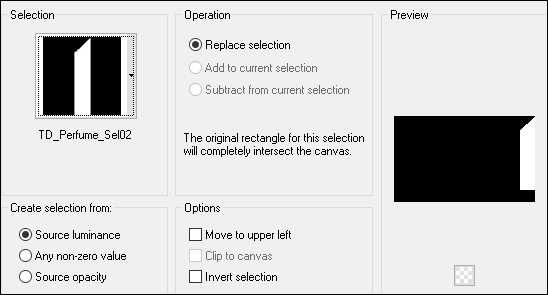
Selections -
Load/Save - Load
Selection - From
Disk -
"TD_Perfume_Sel01"
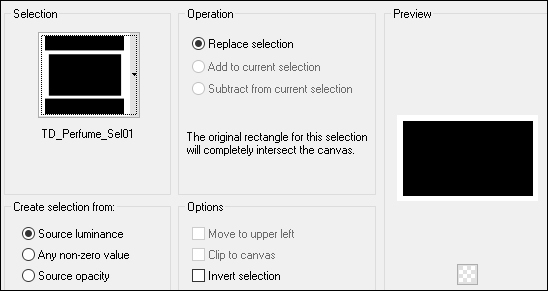
Selections -
Promote Selection to
Layer
Selections -
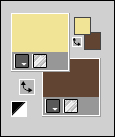
Select None
04
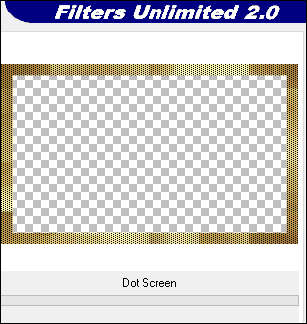
Effects - Plugins
- Filters Unlimited
- Screenworks - Dot
Screen
Layer Palette:
Change the Blend
Mode of this Layer
to Multiply
Layers - Merge -
Merge Down
05
Effects - Plugins
- Simple - Top Left
Mirror
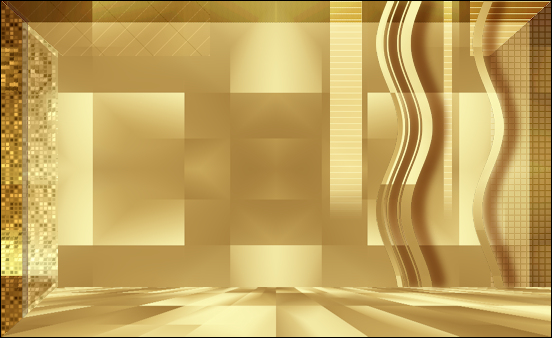
Result:

06
Layer Palette:
Click on the Bottom
Layer (Raster1)
Layers -
Duplicate
Lyers - Arrange -
Bring to Top
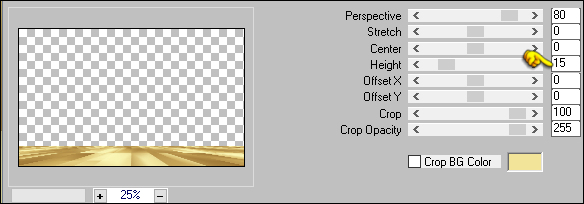
Effects - Plugins
- MuRa's Meister -
Perspective Tiling
07
Layer Palette:
Click on Copy of
Raster 1
Selections -
Load/Save - Load
Selection - From
Disk -
"TD_Perfume_Sel02"
Selections -
Promote Selection to
Layer
Selections -
Select None
Effects - Plugins
- penta.com - Dot
and Cross - Default
settings

08
Layer Palette:
Click on the Layer
below (Copy of
Raster1)
Selections -
Load/Save - Load
Selection - From
Disk -
"TD_Perfume_Sel03"
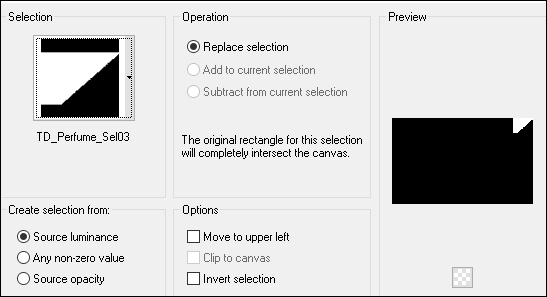
Selections -
Promote Selection to
Layer
Selections -
Select None
09
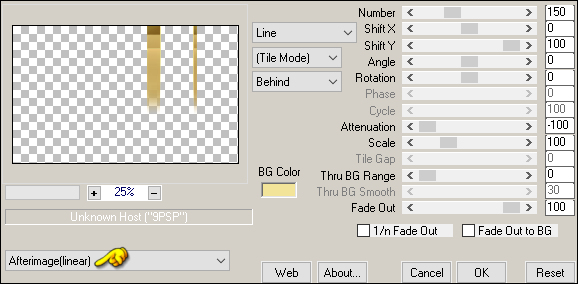
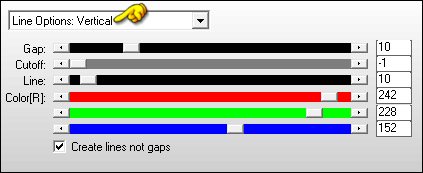
Effects - Plugins
- AP [Lines] - Lines
- SilverLining

Note: The Bottom
three settings will
depend on your
chosen colors.
Change the Hue,
Saturation, and
Lightness to match
your main color

Layer Palette:
Change the Blend
mode of this Layer
to Screen
10
Layer Palette:
Click on the Layer
below (Copy of
Raster1)
Selections -
Load/Save - Load
Selection - From
Disk -
"TD_Perfume_Sel04"
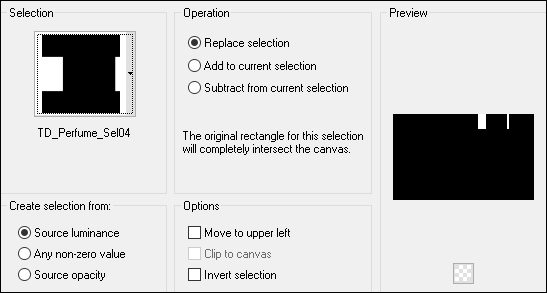
Selections -
Promote Selection to
Layer
Selections -
Select None
11
Effects - Plugins
- MuRa's Meister -
Copies
Effects - Plugins
- AP [Lines] - Lines
- SilverLining
Layer Palette:
Change the Blend
Mode of this Layer
to Screen
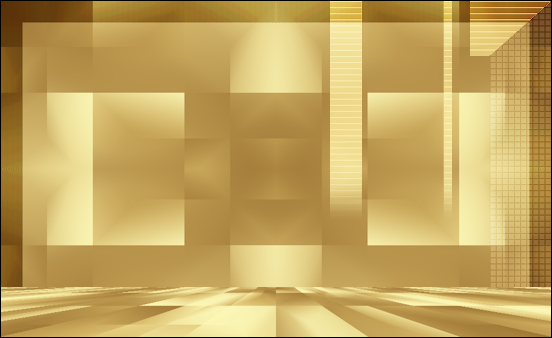
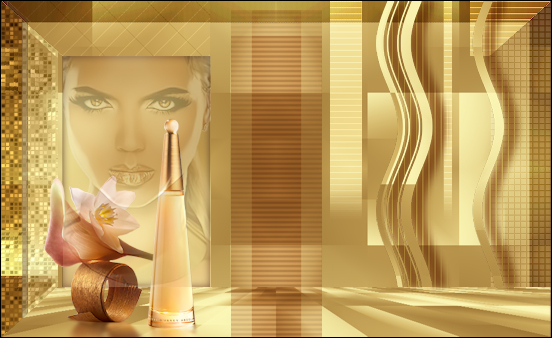
Your work should
look like this now:
12
Layer Palette:
Click on the Layer
below (Copy of
Raster1)
Selections -
Load/Save - Load
Selection - From
Disk -
"TD_Perfume_Sel05"
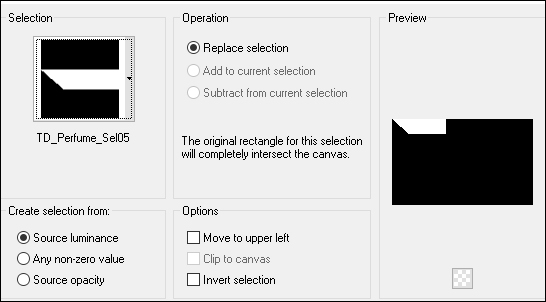
Selections -
Promote Selection to
Layer
Selections -
Select None
Effects - Plugins
- L en K -
landksiteofwonders -
L en K's - Paris
13
Layer Palette:
Click on the Bottom
Layer (Raster1)
Selections -
Load/Save - Load
Selection - From
Disk -
"TD_Perfume_Sel06"
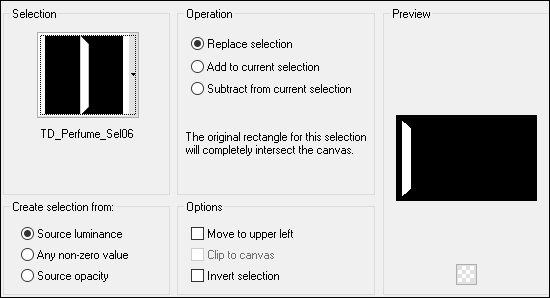
Selections -
Promote Selection to
Layer
Selections -
Select None
Layers - Arrange
- Bring to Top
14
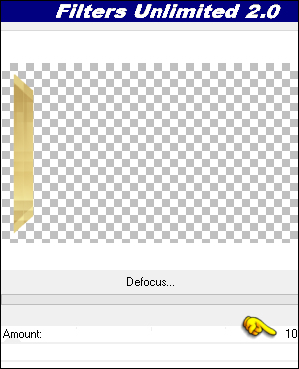
Effects - Plugins
- Filters Unlimited
- Unplugged Effects
- Defocus
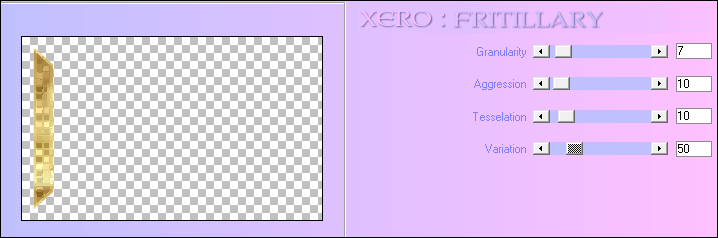
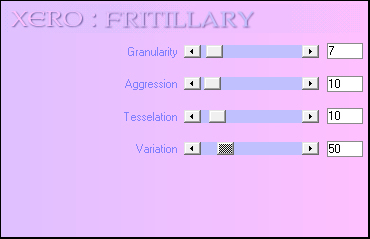
Effects - Plugins
- Xero - Fritillary
15
Layer Palette:
Click on the Bottom
Layer (Raster1)
Selections -
Load/Save - Load
Selection - From
Disk -
"TD_Perfume_Sel07"
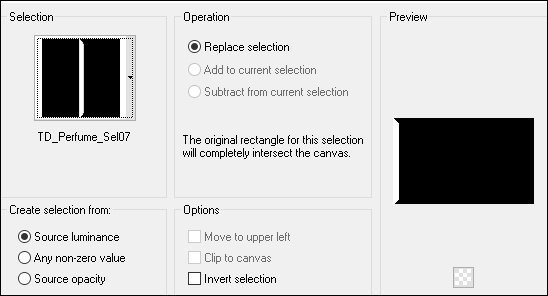
Selections -
Promote Selection to
Layer
Selections -
Select None
Layers - Arrange
- Bring to Top
16
Effects - Plugins
- Xero - Fritillary
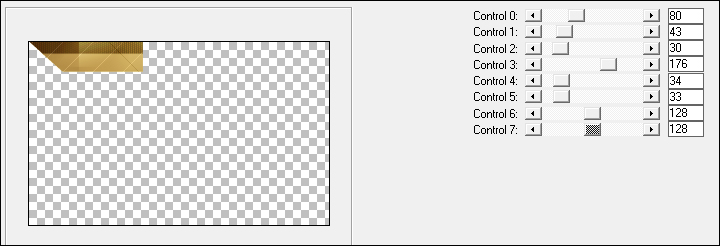
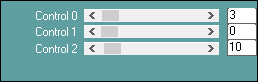
Effects - Plugins
- Adjust Variations
Click once on
Original and
three times on
Darker
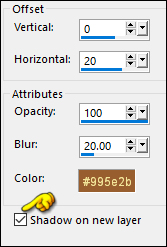
Effects - 3D
Effects - Drop
Shadow:
Vertical: 0
Horizontal: 10
Opacity: 40
Blur: 0
Color:#61432e

17
Selections -
Load/Save - Load
Selection - From
Disk -
"TD_Perfume_Sel08"
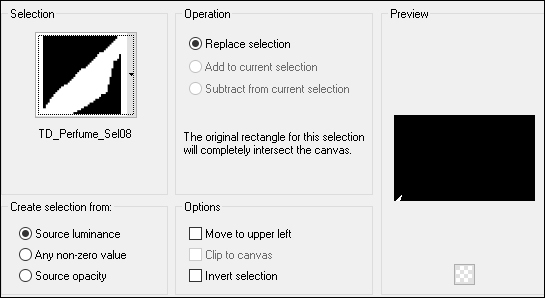
Press the Delete
key on your keyboard
Selections -
Select None
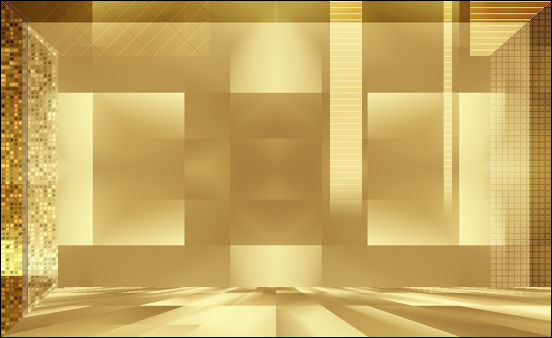
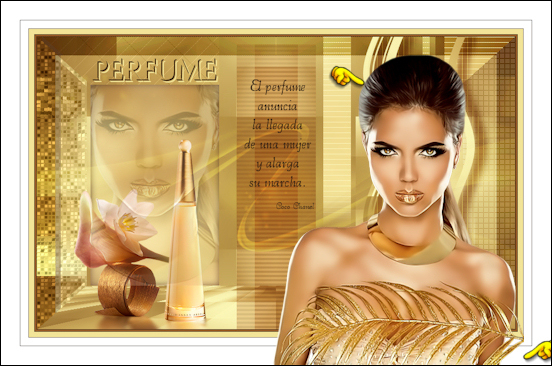
Your work should
look like this now:
18
Layer Palette:
Click on the Bottom
Layer (Raster1)
Selections -
Load/Save - Load
Selection - From
Disk -
"TD_Perfume_Sel09"
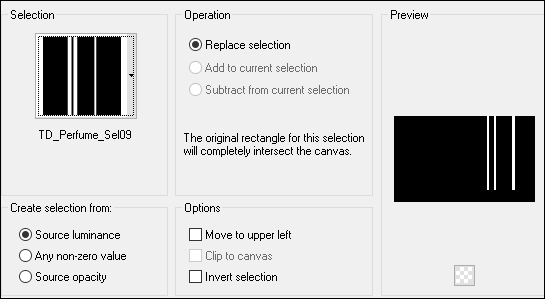
Selections -
Promote Selection to
Layer
Selections -
Select None
Layers - Arrange
- Bring to Top
19
Effects -
Distortion Effects -
Wave

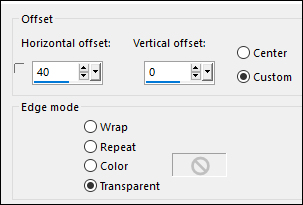
Effects - Image
Effects - Offset
20
Effects - 3d
Effects - Drop
Shadow
Result:
Effects - Plugins
- AP [Lines] - Lines
- SilverLining
Layer Palette:
Change the Blend
Mode of this Layer
to Multiply
and lower the
Opacity to 80
21
Layer Palette:
Click on the Bottom
Layer (Raster1)
Selections -
Load/Save - Load
Selection - From
Disk -
"TD_Perfume_Sel10"
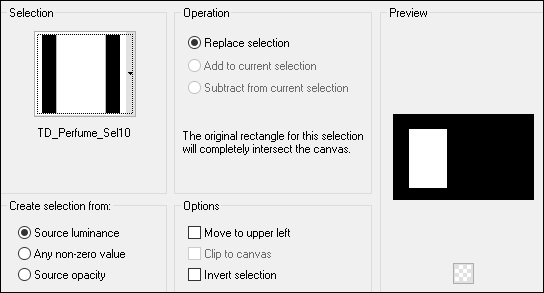
Selections -
Promote Selection to
Layer
Layers - Arrange
- Bring to Top
Adjust - Blur -
Gaussian Blur -
Radius: 25
Keep Selected
22
Maximize
"vio1255" from tray
Erase the
watermark
Edit - Copy
Minimize to tray
for later
On your work
image: Edit -
Paste - Paste As New
Layer
Image - Resize -
120% - Resize All
Layers - not
checked
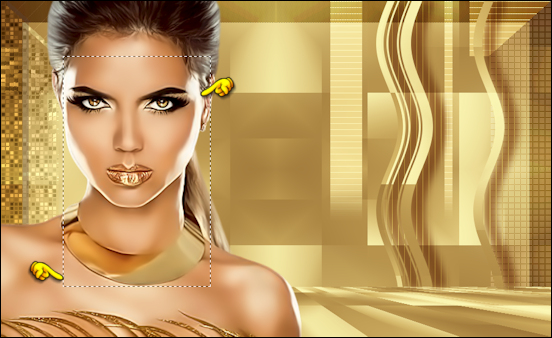
Move into the
Selection like this:
Selections -
Invert
Hit the Delete
key on your keyboard
Layer Palette:
Lower the Opacity of
this Layer to 20
Layers - New
Raster Layer
Effects - 3D
Effects - Drop
Shadow:
Vertical: 0
Horizontal: 0
Opacity: 100
Blur: 20
Color:#61432e
Selections -
Select None
23
Maximize
"TD_Tube_Perfume"
from tray
Edit - Copy the
Middle Layer
On your work
image: Edit -
Paste - Paste As New
Layer
Image - Resize -
60% - Resize All
Layers - not
checked
Pick Tool (K)
 Enter these
parameters for the
X and Y
positions on the
Toolbar
Enter these
parameters for the
X and Y
positions on the
Toolbar
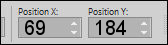 69.00
184.00
69.00
184.00
Press any key to
close the Pick Tool
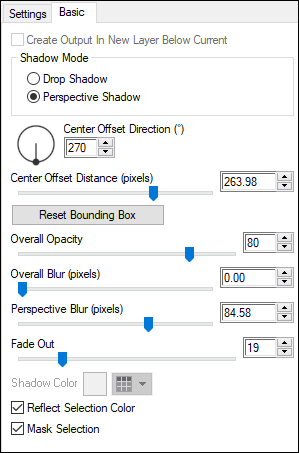
24
Effects - Plugins
- Alien Skin - Eye
Candy 5 - Impact -
Perspective Shadow -
Preset
"TD_Sahdow_Perfume"
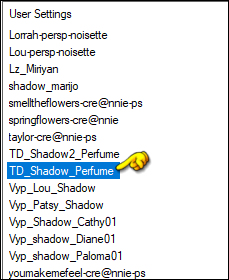
Note: If
the Preset isn't
working for you, use
these settings in
the Basic Tab:
25
Layers - New
Raster Layer
Selections -
Load/Save - Load
Selection - From
Disk -
"TD_Perfume_Sel11"

Flood Fill Tool:
Lower the Opacity to
50 on the
Toolbar

Fill the
Selection with -
#61432e
Raise the Opacity
of the Toolbar back
to 100
Selections -
Select None
26
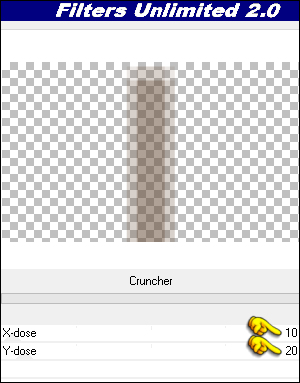
Materials
Palette: Reverse
your Colors
Effects - Plugins
- Filters Unlimited
- &<Bkg Designer
sf10 I> - Cruncher
Effects - Plugins
- Carolaine and
Sensibility -
CS-HLines
Layer Palette:
Change the Blend
Mode of this Layer
to Hard Light
Your work should
look like this now:
27
Layers - New
Raster Layer
Fill the
Selection with the
Foregroundcolor

Layers - New Mask
Layer - From Image -
"TD_Mask_Perfume"
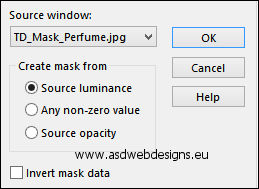
Layers - Merge -
Merge Group
Layer Palette:
Change the Blend
Mode of this Layer
to Screen
28
Maximize
"TD_Texto_Perfume"
from tray
Edit - Copy the
Middle Layer
On your work
image: Edit - Paste
- Paste As New Layer
Pick Tool (K)
Enter these
parameters for the
X and Y
positions on the
Toolbar
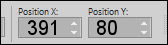 391.00
80.00
391.00
80.00
Press any key to
close the Pick Tool
29
Maximize
"TD_WordArt_Perfume"
from tray
Edit - Copy the
Middle Layer
On your work
image: Edit - Paste
- Paste As New Layer
Pick Tool (K)
Enter these
parameters for the
X and Y
positions on the
Toolbar
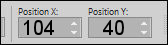 104.00
40.00
104.00
40.00
Press any key to
close the Pick Tool
30
Image - Add
Borders - Symmetric
checked - 1px -
#311f13

Image - Add
Borders - Symmetric
checked - 3px -
#995e2b

Image - Add
Borders - Symmetric
checked - 1px -
#311f13
Image - Add
Borders - Symmetric
checked - 10px -
#f2e498
Image - Add
Borders - Symmetric
checked - 1px -
#61432e
Image - Add
Borders - Symmetric
checked - 15px -
#ffffff

Image - Add
Borders - Symmetric
checked - 1px -
#61432e
Image - Add
Borders - Symmetric
checked - 35px -
#ffffff
31
Maximize
"vio1255" from tray
again
Edit - Copy
On your work
image: Edit -
Paste - Paste As New
Layer
Move down and to
the Right like this:
32
Effects - Plugins
- Alien Skin - Eye
Candy 5 - Impact -
Perspective Shadow -
Preset
"TD_Shadow2_Perfume"
Note: If
the preset isn't
working for you, use
these settings in
the Basic Tab:

Image - Add
Borders - Symmetric
checked - 1px -
#61432e
33
Optional:
Image - Resize - Width 900 Pixels - Resize all Layers checked
Add your name or watermark, save as JPG
file and you're done!