The tutorial:
******
01
Open a new Transparent image 900 X
550px
Effects - Plugins - Mehdi - WavyLab
1.1
02
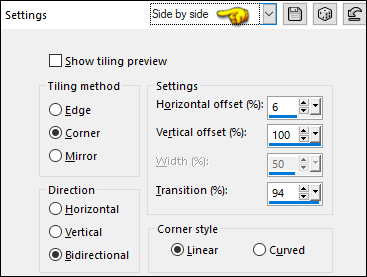
Effects - Image Effects - Seamless
Tiling - Preset - Side by side
Adjust - Blur - Gaussian Blur -
Radius: 35
03
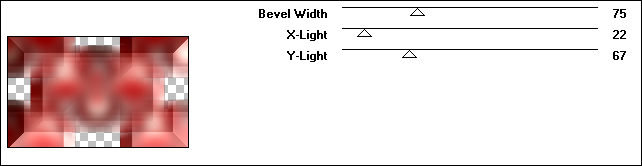
Layers - Duplicate
Effects - Plugins - Filter Factory -
Gallery G - Bevel 1.5 - Default settings

04
Image - Resize - 75% - Resize All
Layers - Not checked
Effects - Edge Effects - Erode
05
Effects - Image Effects - Seamless
Tiling - Preset - Stutter Vertical
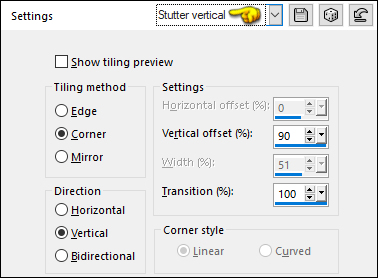
06
Effects - Image Effects - Seamless
Tiling - Default settings

07
Effects - Plugins - Filter Factory - Gallery G - Bevel
1.5 - Default settings
Effects - Edge Effects - Dilate
08
Layers - New Raster Layer
Fill the Layer with #a59a94

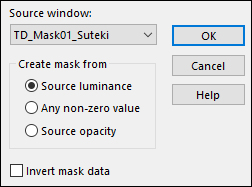
Layers - New Mask Layer - From Image -
"TD_Mask01_Suteki"
Layers - Merge - Merge Group
Change the Blend Mode to
Overlay
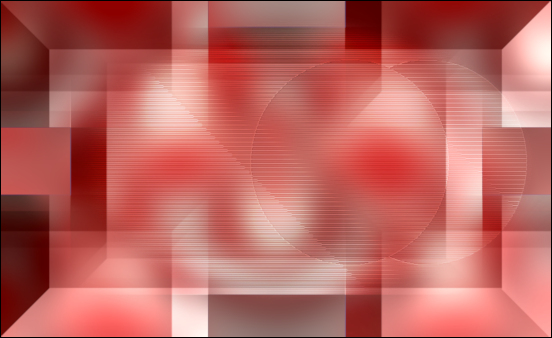
Effects - Edge Effects - Enhance
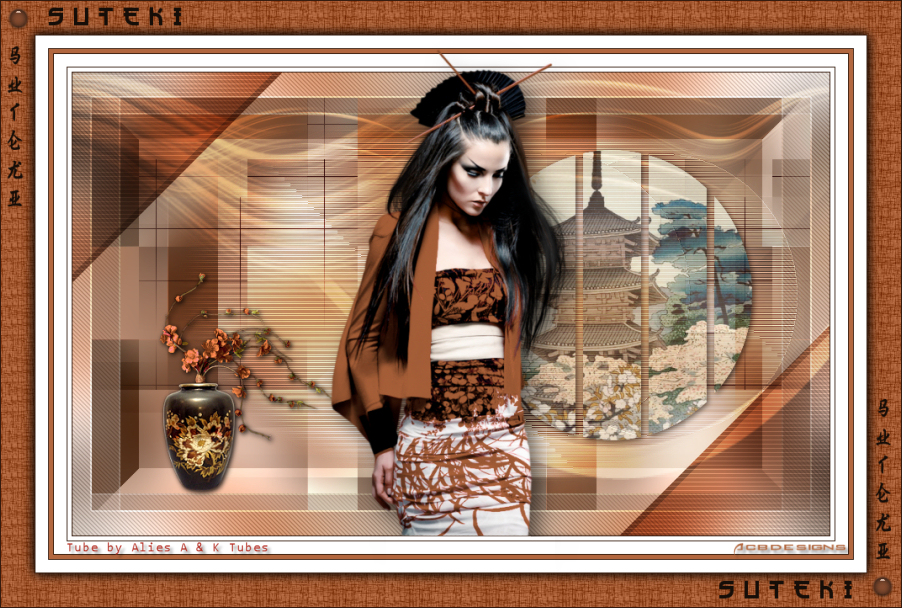
Result:
09
Activate the Bottom Layer
Selections - Load/Save - Load
Selection From Disk - "TD_Suteki_Sel1"
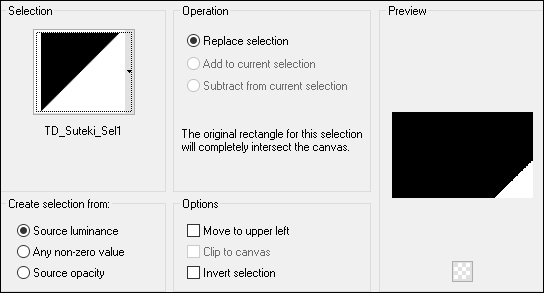
Selections - Promote Selection to
Layer
Layers - Arrange - Move Up
Keep selected
10
Change the Background Color to #650b0b

Effects - Plugins - Carolaine and
Sensibilty - cs_texture- Default settings

Note: You must have
#650b0b
in
the Background to achieve the correct effect
Selections - Select None
11
Layers - Duplicate
Image - Mirror - Mirror Horizontal
Image - Mirror - Mirror Vertical
Layers - Merge - Merge Down
Change the Blend Mode of this Layer to
Multiply
12
Activate the Bottom Layer
Selections - Select All
Selections - Modify - Contract - 40px
Selections - Invert
Selections - Promote Selection to
Layer
Selections - Select None
Layers - Arrange - Move Up
Effects - Edge Effects - Enhance
Effects - Edge Effects - Dilate
13
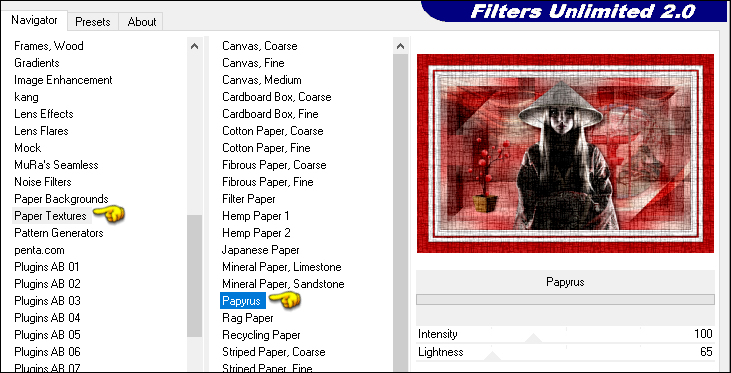
Effects - Plugins - Filters Unlimited
- &<Bkg Designer sf10 I> - Cruncher
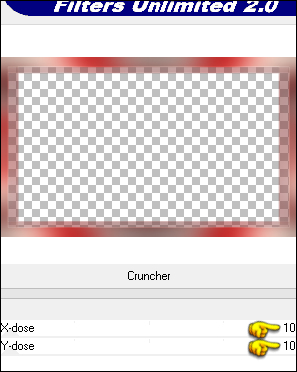
Note: You must have #650b0b
in
the Background to achieve the right effect
14
Effects - Plugins - Caroline and
Sensibility - CS-DLines - Default settings

15
Activate the Bottom Layer
Selections - Load/Save - Load Selection From Disk -
"TD_Suteki_Sel2"
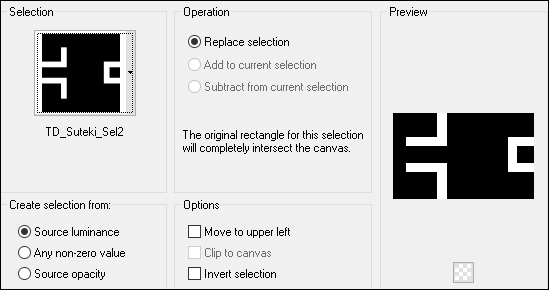
Selections - Promote Selection to
Layer
Selections - Select None
Layers - Arrange - Move Up
16
Change the Background Color to #ffffff

Note: Must be
white to achieve the right effect
Effects - Plugins - Toadies - Weaver -
Default settings

Change the Blend Mode of this Layer to
Multiply
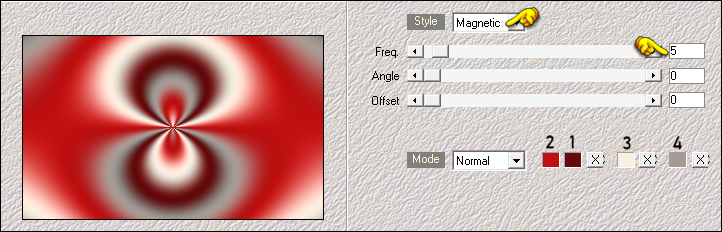
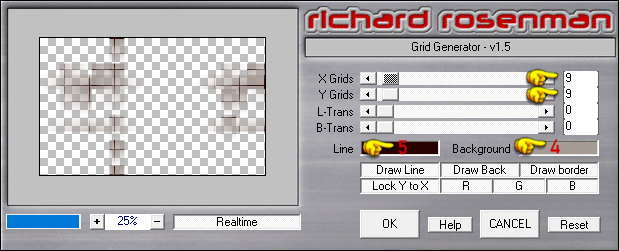
17
Effects - Plugins - Richard Rosenman -
Grid Generator
18
Selections - Load/Save - Load
Selection From Disk - "TD_Suteki_Sel3"
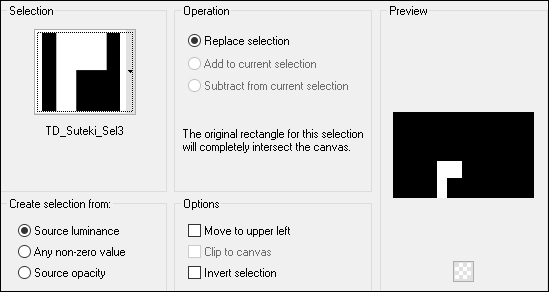
Press the Delete key on your keyboard
Selections - Select None
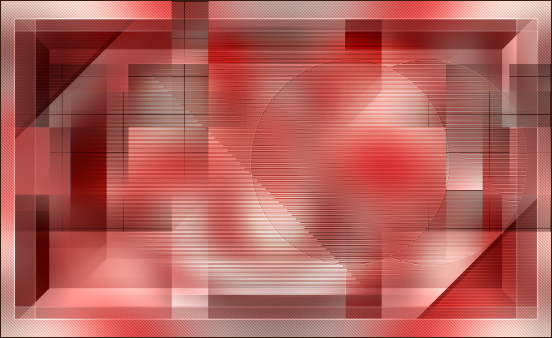
Result:
19
Activate the Top Layer
Open "TD_Imagen_Suteki" from
tray
Edit - Copy
On your work image: Edit - Paste -
Paste As New Layer
Pick Tool (K)

Enter these parameters for the X: and
Y: positions on the Toolbar
X: 416.00 Y: 45.00
Press M to close the
Pick Tool
20
Selections - Load/Save - Load Selection From Disk -
"TD_Suteki_Sel4"

Press the Delete key on your keyboard
Selections - Select None
Effects - 3D Effects - Drop Shadow:
2/2/100/10 Color:
#290101

Lower the Opacity of this Layer to
60
Layers - Arrange - Move Down
21
Layers - New Raster Layer
Fill the Layer with #f9eee0

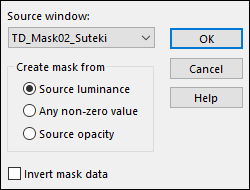
Layers - New Mask Layer - From Image -
"TD_Mask02_Suteki"
Layers - Merge - Merge Group
Change the Blend Mode of this Layer to
Overlay
22
Open "TD_Deco1_Suteki" from tray
Edit - Copy the Middle Layer
On your work image: Edit - Paste
- Paste As New Layer
Pick Tool (K)
Enter these parameters for the X: and
Y: positions on the Toolbar
X: 96.00 Y: 215.00
Press M to close the
Pick Tool
Effects - 3D Effects - Drop Shadow:
2/5/50/10 Color:
#290101
23
Open "Leny-vrouw549" from tray
Edit - Copy the Top Layer
On your work image: Edit - Paste -
Paste As New Layer
Image - Resize 85% - Resize All Layers
- Not checked
Edit - Repeat image - Resize
Pick Tool (K)
Enter these parameters for the X: and
Y: positions on the Toolbar
X: 257.00 Y: 10.00
Press M to close the
Pick Tool
24
Adjust - Sharpness - Sharpen
Adjust - Brightness and Contrast
- Brightness/Contrast
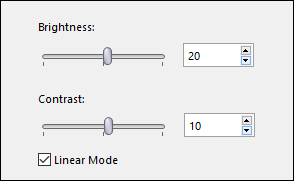
Note: This setting is
for the tube supplied.
You may not need to apply this to your
own tube
Effects - 3D Effects - Drop Shadow: 10/10/80/20
Color: #290101
25
Image - Add Borders - Symmetric
checked - 1px - #290101
Image - Add Borders - Symmetric checked - 5px - #ffffff
Image - Add Borders - Symmetric
checked - 1px - #290101
Image - Add Borders - Symmetric checked - 15px - #ffffff
Image - Add Borders - Symmetric checked - 1px - #290101
Image - Add Borders - Symmetric checked - 5px -
#c01111

Image - Add Borders - Symmetric checked - 1px - #290101
Image - Add Borders - Symmetric checked - 15px - #ffffff
Image - Add Borders - Symmetric checked - 1px - #290101
Image - Add Borders - Symmetric checked - 40px -
#c01111
26
Magic Wand: