02
Open Image "@nn_280914_bg_110_tdstudio[3]"
Note:
If
you are using tubes and colors of
your own,
it is best to use the image provided in the
Materials for this step, otherwise
the result will be different. You
can colorize it to match your work.
Window - Duplicate
(or shift+D) - Close the original
and proceed on the copy
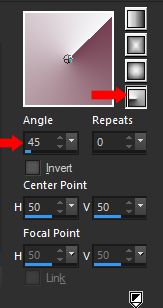
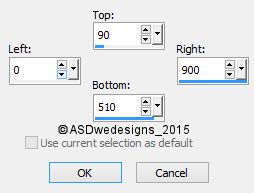
Selection Tool -
Rectangle
 - Custom
Selection:
- Custom
Selection:
Edit - Copy
03
Go back to your main work image
Layers - New Raster Layer
Selections - Select All
Edit - Paste
Into Selection
Selections - Select
None
Layer Palette -
Double click on this Layer and set the Blend Mode to
"Soft Light"
04
Selection Tool -
Rectangle
- Custom
Selection:
Selections -
Promote Selection to Layer
Tip: Colorize if you use
different colors!
Edit - Repeat Promote Selection
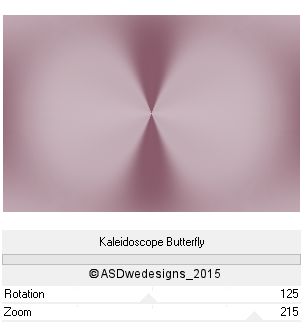
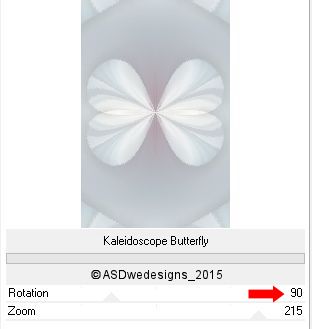
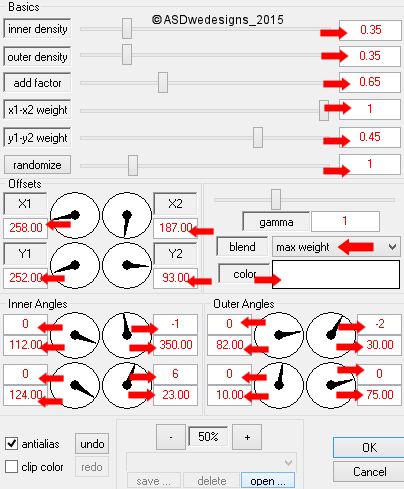
Effects - Plugins -
<I.C.NET
Software>
Filters
Unlimited -
&Bkg Kaleidoscope> - Kaeidoscope
Butterfly
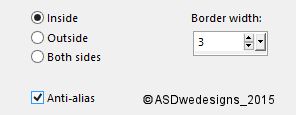
Selections - Modify - Select
Selection Borders
Fill the
Selection with
the
Backgroundcolor
 (Right Mouse
Click)
(Right Mouse
Click)
Selections - Select None
Image - Resize - 50% - Resize
all Layers not checked
Effects - Image Effects - Seamless
Tiling
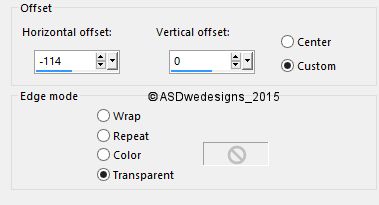
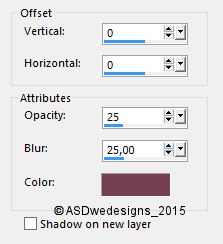
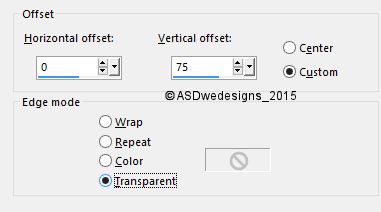
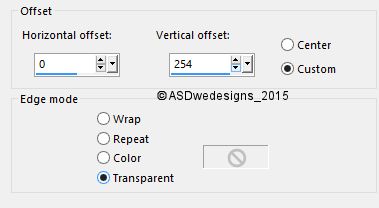
Effects - Image Effects - Offset
05
Layer Palette - Click on the Second Layer from the Top
Tip: Colorize if you did so
before!
Layers - Duplicate
Image - Flip Horizontal (earlier PSP
versions: Image - Mirror)
Image - Flip Vertical (earlier PSP
versions: Image - Flip)
Layers - Merge - Merge Down
Effects - Plugins -
L&K SiteOfWonders -
L en K"s
Zitah
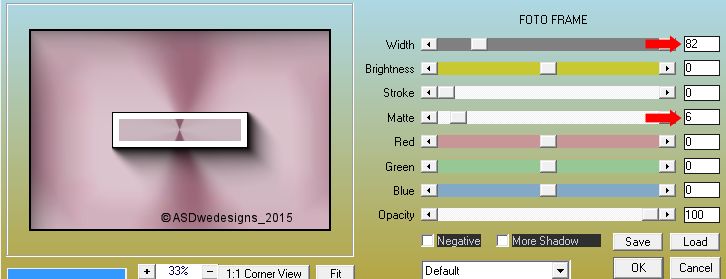
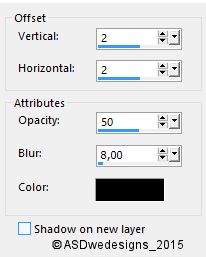
Effects - 3D Effects - Dropshadow -
Color
Foregroundcolor

Layer Palette -
Double click on this Layer and set
the Layer Opacity of this Layer to
80
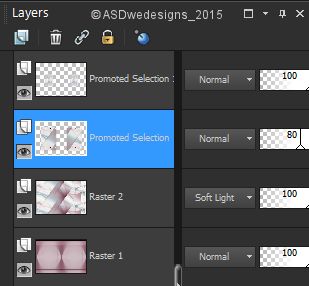
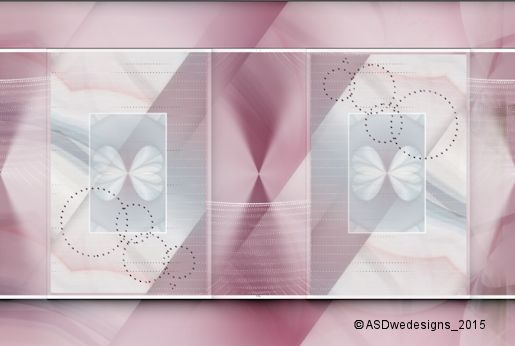
Your work and Layer Palette look
like this now:
Color Palette:
Set the
Foreground
Gradient back to
Color
#754152
Layer Palette - Click on the Top
Layer
Layers - New
Raster Layer
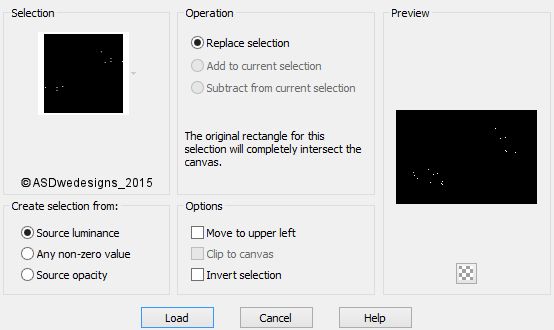
Selections - Load/Save Selection -
Load Selection From Disk
- ASDwebs_Sel_#461
Zoom in to 250 %
Fill the
Selection with the
Foregroundcolor
Selections -
Select None
Zoom out to 100
% again
Effects - 3D Effects -
Dropshadow -
Color #000000

07
Layer Palette - Click on the Second Layer from
the Bottom
Layers - New
Raster Layer
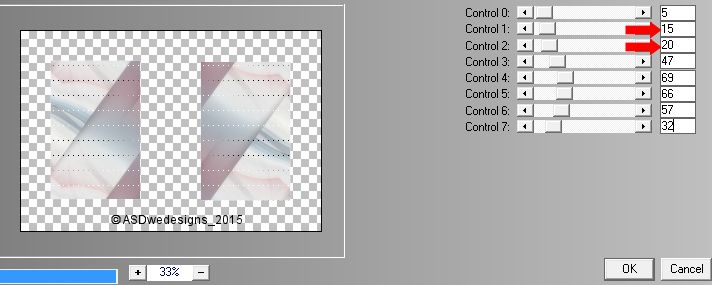
Effects -
Plugins - Dragonfly -
Sinedots II
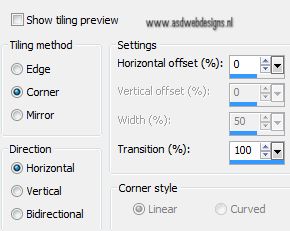
Effects - Image Effects - Seamless
Tiling - Default settings
Effects - Image
Effects -
Offset:
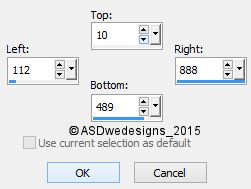
Selection Tool -
Rectangle
- Custom
Selection:
Selections - Invert
Edit - Cut (Or hit the Delete Key of
your Keyboard)
Selections -
Select None
08
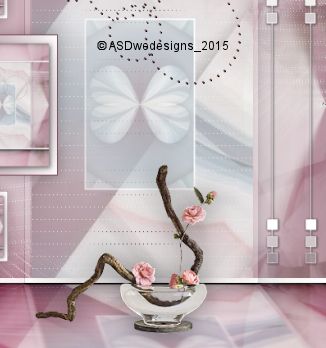
Layers - Merge - Merge all (Flatten)
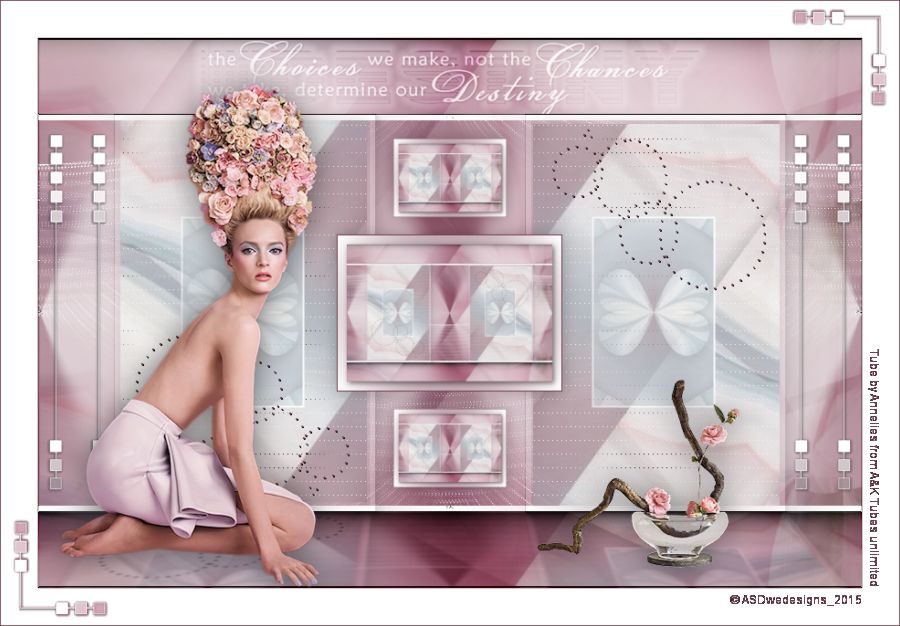
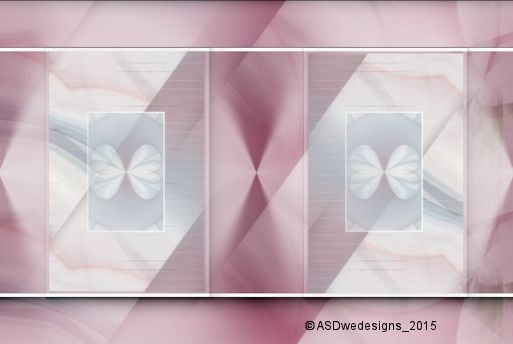
Your work looks like this now:
09
Window - Duplicate (or
shift+D)
Proceed on the copy
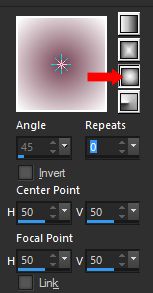
Color Palette: Set your Foregroundcolor to
Foreground/Background Gradient
(Corel_06_029) - Style:
Sunburst
Image - Resize - 25% - Resize all
Layers checked
Selections -
Select All
Image - Add Borders - Symmetric
checked - 10 px - #ffffff
Selections -
Invert
Fill the
Selection with
the Gradient

Selections -
Invert
Effects - 3D Effects -
Dropshadow -
Color #000000
Selecttions - Select None
Image - Add Borders - Symmetric
checked - 1 px -
Color Foregroundcolor
Edit - Copy
10
Go back to your
main image
Edit - Paste As
New Layer
Layers -
Duplicate
Image - Resize - 50% - Resize all
Layers not checked
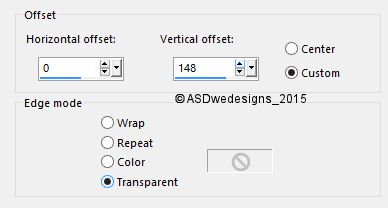
Effects - Image
Effects - Offset
11
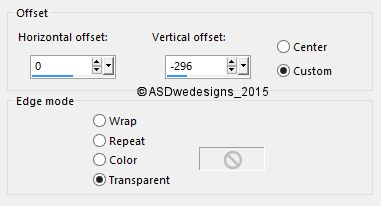
Layers -
Duplicate
Effects - Image
Effects - Offset
Layers - Merge -
Merge Down
Edit - Repeat
Layers Merge
Down
Adjust -
Sharpness -
Sharpen
Effects - 3D Effects -
Dropshadow -
Color #000000
Layer Palette - Click on the Bottom
Layer
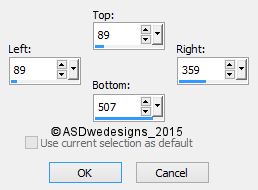
Selection Tool -
Rectangle
- Custom
Selection:
-
Same settings as
before
Selections -
Promote Selection to Layer
Effects - Plugins -
Alien Skin Eye Candy
5 - Impact -
Perspective Shadow
- Settings
Tab:
Preset
ASDwebs_pps_Shadow_03
Edit - Cut!!! (Or hit the Delete Key of
your Keyboard)
Selections -
Select None
Selection Tool -
Rectangle
- Custom
Selection:
Edit - Cut (Or hit the Delete Key of
your Keyboard)
Selections - Select None
Layer Palette -
Double click on this Layer and set the Blend Mode to
"Multiply"
13
Layers -
Duplicate
Layer Palette -
Double click on this Layer and set the Blend Mode to
"Hard Light" and the Layer Opacity to 70
14
Layer Palette: Click on the Top layer
Open Tube "ASDwebs_Deco_#2107"
Edit - Copy
On your work image: Edit - Paste
As New Layer
Effects - Image
Effects - Offset
Layers - Duplicate
Effects - Image
Effects - Offset
Layers - Merge -
Merge Down
Tip: Set the Blend
Mode to Luminance
Legacy if you are using
colors of your own
Layers - Duplicate
Image - Flip Horizontal (earlier PSP
versions: Image - Mirror)
15
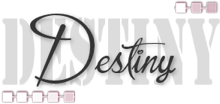
Open Tube "Wordart_Destiny"
Edit - Copy
On your work image: Edit - Paste
As New Layer
Effects - Image
Effects - Offset
Layer Palette -
Double click on this Layer and set the Blend Mode to
"Overlay" and the Layer Opacity to 85
16
Open Tube "maelledreams-deco30"
Edit - Copy
On your work image: Edit - Paste
As New Layer
Image - Resize - 40% - Resize all
Layers not checked
Move to the Bottom
Right side of your
image like this:
Adjust - Sharpness - Sharpen
Effects - 3D Effects -
Dropshadow -
Color #000000
17
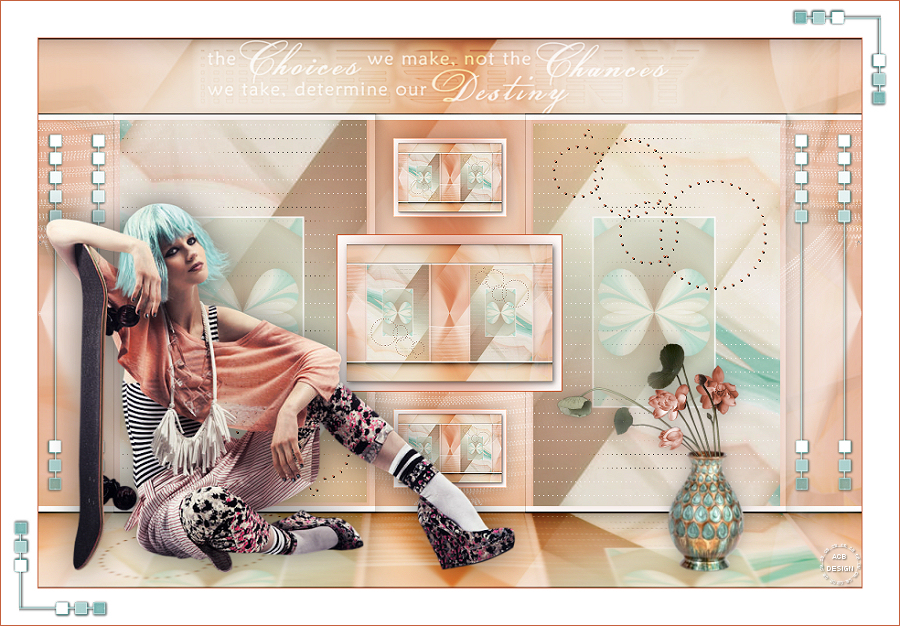
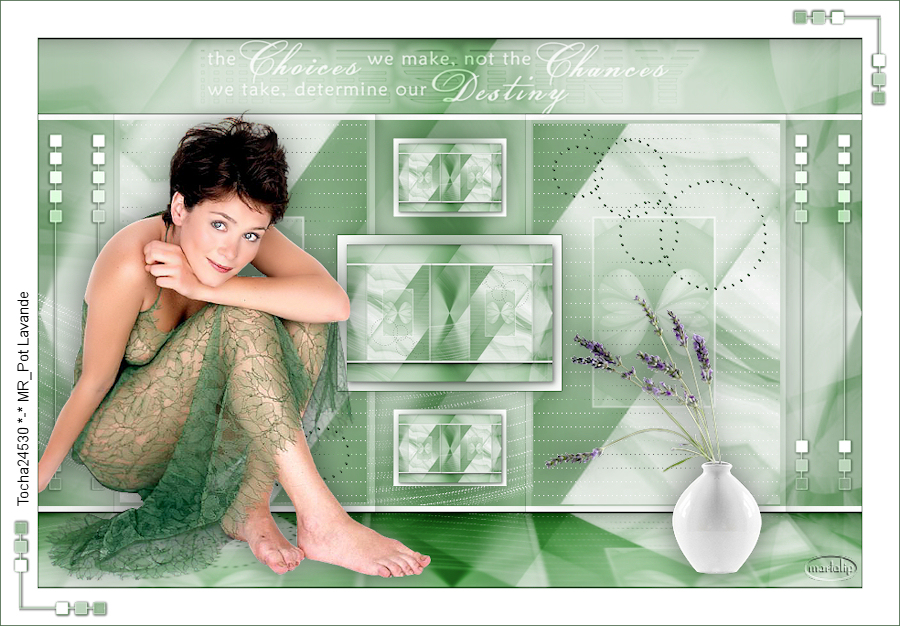
Open Tube "Alies
1VR952-woman-03042014"
Edit - Copy
On your work image: Edit - Paste
As New Layer
Image - Flip Horizontal (earlier PSP
versions: Image - Mirror)
Image - Resize - 85% - Resize all
Layers not checked
Move to the Bottom
Left side of your
image like this:
Adjust - Sharpness - Sharpen
Effects - 3D Effects -
Dropshadow -
Color #000000
18
Image - Add Borders - Symmetric
checked - 1 px -
#754152
Image - Add Borders - Symmetric
checked - 40 px -
#ffffff
19
Open Tube "ASDwebs_Deco_#2108"
Edit - Copy
On your work image: Edit - Paste
As New Layer
Tip: Colorize
if you use different
colors
No need to Move
Image - Add Borders - Symmetric
checked - 1 px -
#754152
20
Image - Resize - Width 900Pixels
- Resize all Layers checked