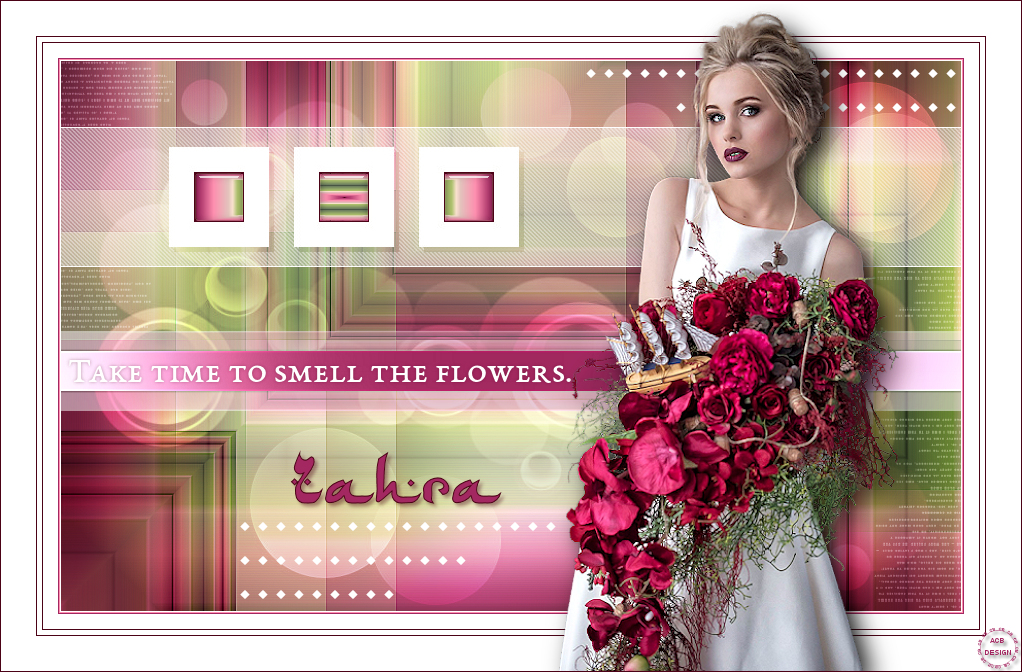
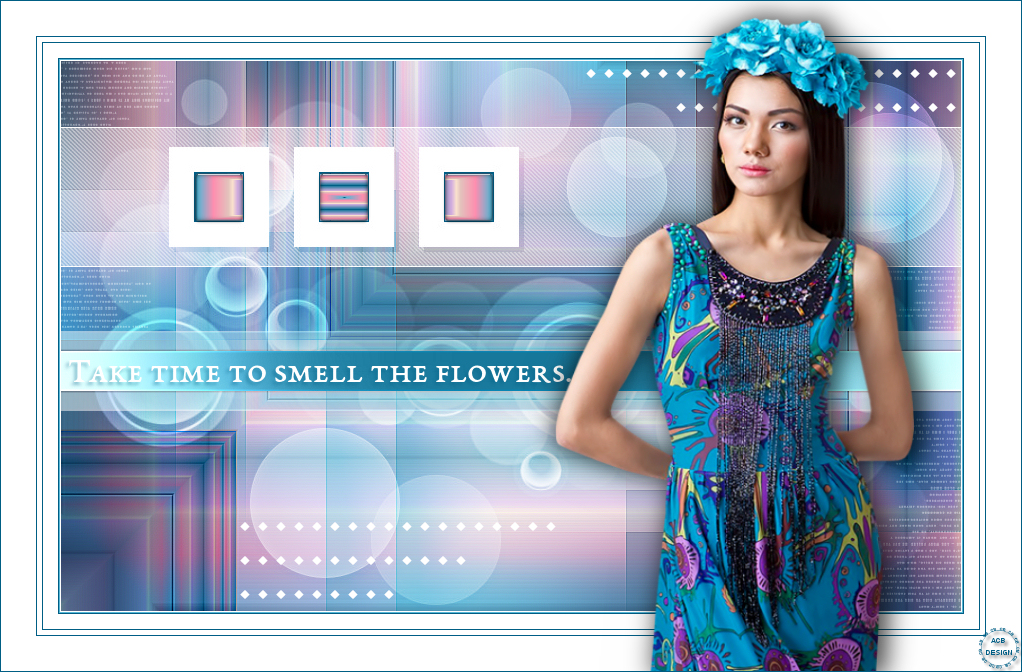
The tutorial:
******
01
Open a new Transparent image 900 X
550px
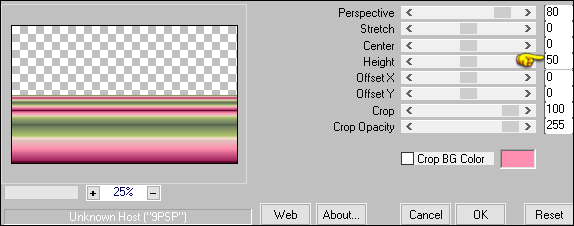
Fill the image with the Gradient

02
Layers - Duplicate
Effects - Plugins - MuRa's Meister -
Perspective Tiling
03
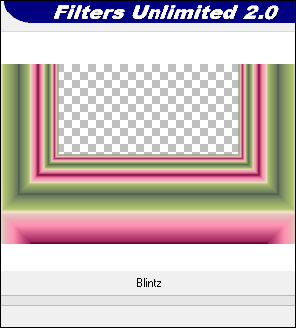
Effects - Plugins - Filters Unlimited
- Simple - Blintz
04
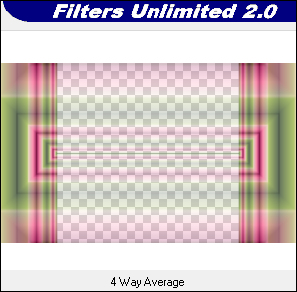
Effects - Plugins -
Filters Unlimited -
Simple - 4 way
Average
Adjust - Sharpness - Sharpen More
05
Effects - Reflection Effects -
Rotating Mirror
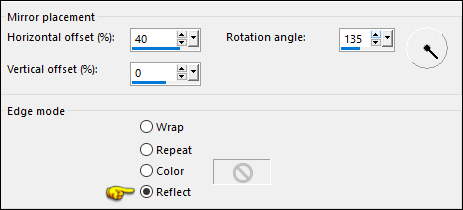
06
Image - Mirror - Mirror Horizontal
Effects - Plugins - Graphics Plus -
Emboss - Default settings
Change the Blend Mode to
Multiply
07
Activate the Bottom Layer
Effects - Plugins - Graphics Plus - Cross Shadow
Adjust - Blur - Gaussian Blur -
Radius: 35
08
Effects - Plugins - Mehdi - Sorting
Tiles
Effects - Edge Effects - Enhance
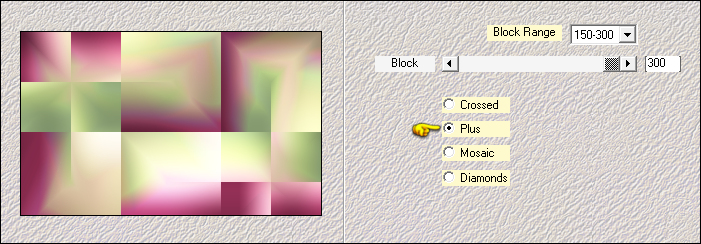
09
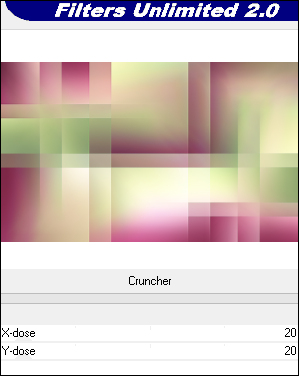
Effects - Plugins - Filters Unlimited
- &<Bkg Designer sf10 I> - Cruncher - Default settings
10
Activate the Top Layer
Layers - New Raster Layer
Fill the Layer with the Foreground
Color (1) 
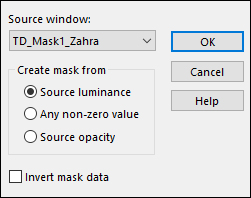
Layers - New Mask Layer - From Imade -
"TD_Mask1_Zahra
Layers - Merge - Merge Group
11
Layers - New Raster Layer
Magic Wand:

Click inside the three frames
Fill the Selections with (4) #4c0216

Selections - Modify - Contract - 1px
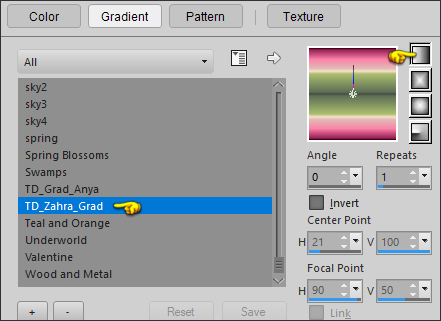
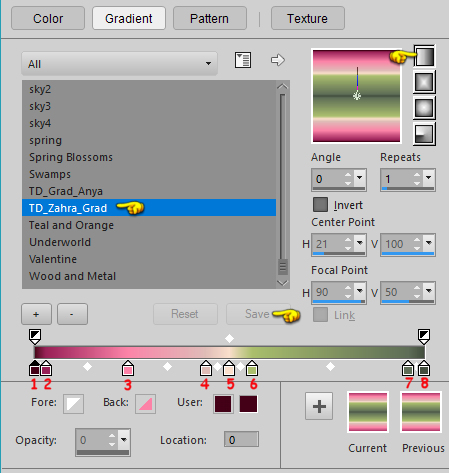
12
Change the Gradient settings to

Fill the Selections with the Gradient

Keep the Selection
13
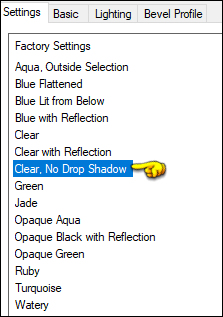
Effects - Plugins - Eye Candy 5 -
Impact - Glass - Preset - "Clear, No Drop
Shadow"
Selections - Select None
14
Layers - New Raster Layer
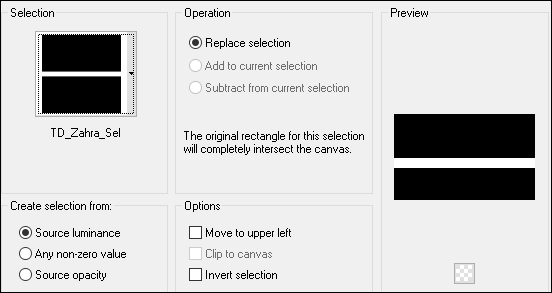
Selections - Load/Save - Load
Selection From Disk - "TD_Zahra_Sel"
Fill the Selection with (2) #a32761

Selections - Select None
15
Effects - Plugins - Filters Unlimited - Special Effects
2 - Border White Fade 2 - Default settings

16
Effects - Plugins - Filters Unlimited - &<Bkg Designer
sf10 I> - Cruncher

Adjust - Sharpness - Sharpen More
17
Open TD_Deco1_Zahra"
Edit - Copy the Middle Layer
On your work image: Edit - Paste -
Paste As New Layer
Pick Tool (K)

Enter these parameters for the X: and
Y: positions on the Toolbar
X: 179.00 Y :8.00
Press M to close the
Pick Tool
18
Open TD_Deco2_Zahra"
Edit - Copy the Middle Layer
On your work image: Edit - Paste -
Paste As New Layer
No need to move
Change the Blend Mode to Soft Light
19
Activate Copy of Raster 1
Layers - New Raster Layer
Fill with the Foreground Color (1)
Layers - New Mask Layer - From Image "TD_Mask2_Zahra"

Layers - Merge - Merge Group
Effects - 3D Effects - Drop Shadow:
0/0/60/20 Color: (4) #4c0216
Change the Blend Mode to
Overlay
20
Activate the Top Layer
Open "TD_Texto_Zahra" from tray
Edit - Copy the Middle Layer
On your work image: Edit - Paste -
Paste As New Layer
Pick Tool (K)
Enter these parameters for the X: and
Y: positions on the Toolbar
X: 8.00 Y : 299.00
Press M to close the
Pick Tool
Effects - 3D Effects - Drop Shadow: 0/0/40/5
Color: (4) #4c0216
21
Open "TD_Title_Zahra" from tray
Edit - Copy the Middle Layer
On your work image: Edit - Paste - Paste As New Layer
Pick Tool (K)
Enter these parameters for the X: and
Y: positions on the Toolbar
X: 229.00 Y :
389.00
Press M to close the
Pick Tool
Effects - 3D Effects - Drop Shadow: 3/3/40/5
Color: (4) #4c0216
22
Image - Add Borders - Symmetric
checked - 1px (1) #ffffff
Image - Add Borders - Symmetric
checked - 1px (2) #ff8fb0

Image - Add Borders - Symmetric
checked - 1px (3) #a32761
Image - Add Borders - Symmetric checked - 15px
(1) #ffffff
Image - Add Borders - Symmetric checked - 1px (1)
#4c0216
Image - Add Borders - Symmetric checked - 5px (1)
#ffffff
Image - Add Borders - Symmetric checked - 1px (1)
#4c0216
Image - Add Borders - Symmetric checked - 35px
(1) #ffffff
23
Open the main tube you have chosen
Edit - Copy
On your work image: Edit - Paste -
Paste As New Layer
Resize if necessary and move to the
Right (See example)
Note: If you are
using the tube in the example: Image - Resize - 75%
Pick Tool (K)
Enter these parameters for the X: and
Y: positions on the Toolbar
X: 551.00 Y : 5.00
Press M to close the
Pick Tool
Adjust - Sharpness - Sharpen
24
Effects - Plugins - Eye Candy 5 -
Impact - Perspective Shadow - Preset - "Drop Shadow,
Blurry
Image - Add Borders - Symmetric checked - 1px (1)
#4c0216
25